How to Make String Art: A Beginner’s Guide
String art is a great way to personalize a DIY project for wall art for your home or for a fun gift! This step-by-step tutorial will help you make string art, even if you are a complete beginner!
Sometimes DIY projects just fall into our lap. My brother-in-law was recently on vacation with his family in Destin, Florida. He sent a picture of a fun beach string art project that he very subtly mentioned he would love to have my daughter make.

This post contains affiliate links. Should you purchase something after clicking through a link, we might make a small commission at no extra cost to you. See my disclosure policy for further details.
So, what is needed for string art?
You very well might have many of these supplies already on hand!
SUPPLIES for String Art Project:
- Embroidery thread / embroidery floss
- Wood Plaque / piece of wood- I got mine at Hobby Lobby, but here is something similar on Amazon. I have also seen some nice wood at WalMart as well. Or, if you are handy, you could use some scrap boards to put this together. String art can also be done on inexpensive canvas!
- Pattern for string art / simple shape. We printed an image of a seahorse found online. Google whatever you want to use as your pattern and use it as an outline! Keep in mind, if you are a beginner, string art patterns should be simple.
- Small Nails We ended up using the 18 gauge x 3/4 inch nails.
- Small Hammer
- Scissors to cut string as needed
- Stencil (I used my Silhouette Cameo 3 to make our words on the sign, but you could easily stencil them with acrylic paint.)

See more easy craft projects here.


Wondering what size nails to use? We ended up using wire nails, the 18 gauge x ¾ inch small nails.
Let me give you a little background about this diy string art tutorial…In December, we went to some dear friends’ annual Christmas party. Each year they have a fun craft prepared for the kids to complete.
This past year, they used lumber from an old family barn and hammered nails in the shape of a Christmas tree.
Each of the kids made a tree with different colors of green string. My daughter made an extra for her Uncle Justin. We all loved how they turned out and were looking forward to adding more string art to our collection.
We now had our opportunity! I love when I can convince family members to participate in easy projects.
My husband and son were at a Kansas City Royals game recently with my father-in-law, so it was just us girls at home. We enjoyed an outdoor craft night on our new patio.
Keep in mind there are different ways to complete string art, even using a string art kit. But these instructions are simple and what I find to be the best way to complete your first string art pieces.
TRY THIS DIY: How to Hang Outdoor String Lights
STEPS FOR STRING ART PROJECT:
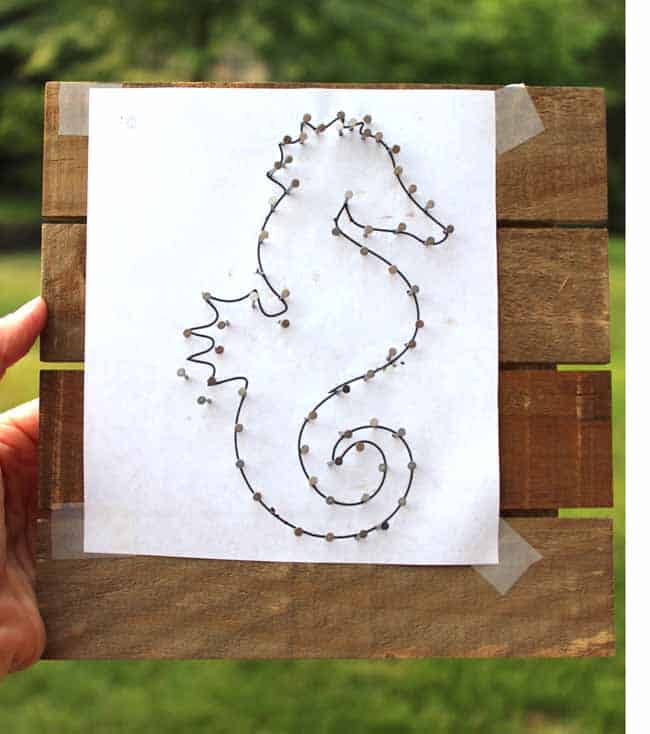
1. Print an image of choice to use as your design.
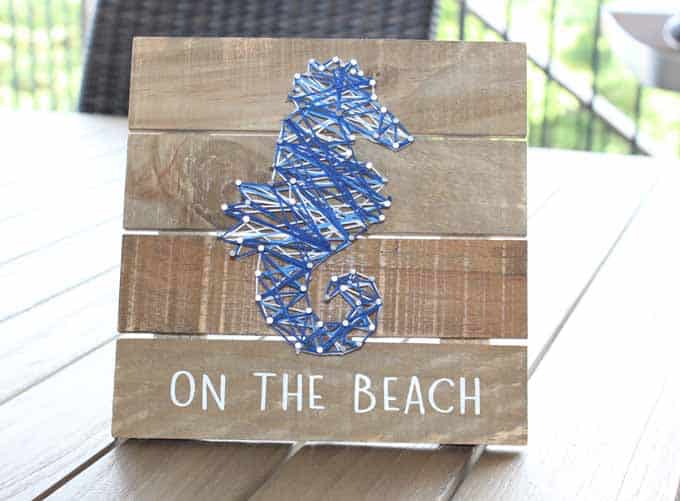
The art my brother-in-law mentioned was a seahorse.
So, we googled images of seahorses and found something with a fairly basic outline, then printed it on a blank piece of paper to use as a paper template. But, you can use an image of whatever is personal and fun for you for a paper pattern.
The second time I do this, I’d love to make a state string art, a soccer ball, use a shape template, or even a simple heart string art.
The fun part about this project is there is no wrong way to do it. There are many fun (and easy ideas).
It’s a great idea to print an extra copy of your image so you can use that as a guide later. Think of it as the image on a puzzle box. It helps to visualize what you’re doing, especially if this is your first time.
2. Hammer the nails along the border of your image for the pattern.
You will need an outline for your string art.
Tape the side of your paper to the wooden board to ensure it doesn’t move around as you are putting in the nails. Be sure to center your image on the wood board.
Use wire nails or linoleum nails as they have a nice nail head with enough space to keep the string from slipping off and are the perfect size on the wood board. You can find these at your local craft store or hardware store.
Then simply hammer around the outline! Pound nails into the wood piece along the string art design.
Another great DIY craft: How to Tie Dye Shirts {EASY TUTORIAL}
3. After all of the nails are in place, gently pull off the paper for a nice outline.
You’ll then have a nice outline / pattern for your string art project. Keep in mind that nail and string art can be made with just about any design. Make it personal to you!

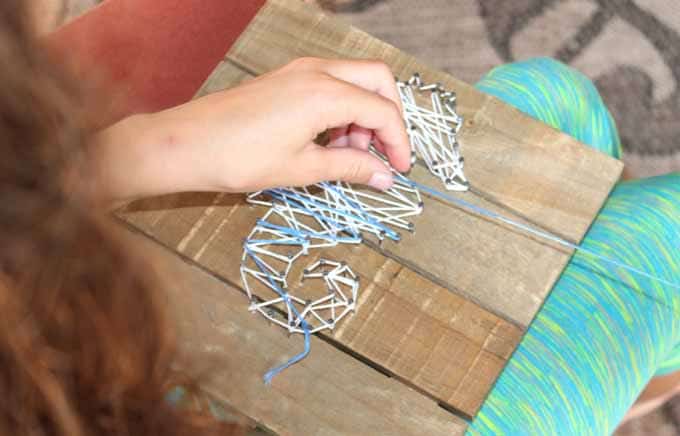
4. Start stringing your embroidery thread.
We simply tied a double knot with the end of the string around the first nail and got started.
It works best to outline the general shape of your outline.
Use a variety of string colors for more depth and visual interest!
On our seahorse piece of art, we started with white thread for the base. Then my daughter used a medium blue and finally a dark, royal blue thread. With each new color, just tie a knot around an outside nail, and continue with your string pattern.
We didn’t worry too much about the details. I helped get the first layer going so she could see the image better. Then, I let her do the rest. She had so much fun.

Lots of zig zag with the string. The great thing about this is people of all skill levels can complete enjoy this fun project as no special skills are required. From little girls to adults, it’s the perfect project.
REMEMBER: As I mentioned above, be sure to print off another copy of your image as a guide. It was really helpful to keep us from placing string outside of the borders.
See more summer diys and crafts here.
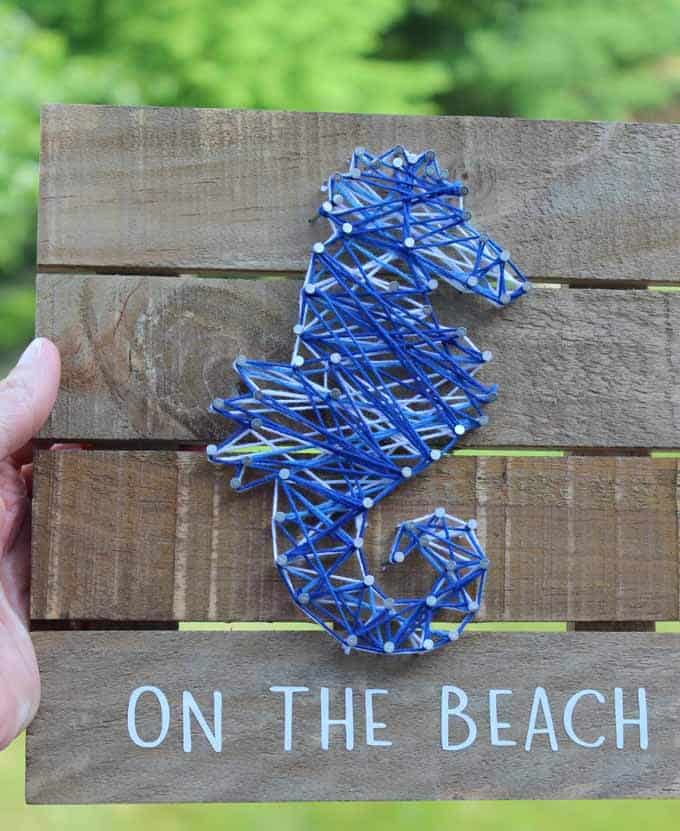
5. Cut off loose strings.
After finishing each of your colors, be sure to cut off any excess string / loose ends of the strings.

6. Add a phrase / words to your sign if you’d like.
We wanted to add the phrase “On the Beach” to our string art project. You can obviously personalize this as you’d like, depending on what design you choose.
Jason, my husband, got me a Silhouette Cameo 3 for Christmas. I have only used it a few times because I find it really intimidating for some reason. BUT, I did manage to use it for this. It was actually pretty easy to use and I’m imagining all of the projects I can try.
Do you have a Silhouette Cameo? If so, comment below with the things you like to make!
IF YOU DON’T HAVE A SILHOUETTE CAMEO, CONSIDER STENCILING YOUR PHRASE:
I thought about just using a stencil and painting in the words with chalk paint or acrylic paint. If you don’t have a Silhouette Cameo, that would be a great option. I have stenciled on several projects and loved the outcome. Here are a few if you’d like a little guidance:
- Stenciling on Terra Cotta Pots
- Reusable Fabric Gift Sacks for All Occasions
- DIY 4th of July Home Decor
This is definitely an easy string art project for beginners. We were able to knock this simple string art out AND enjoy a movie for our girls’ night!
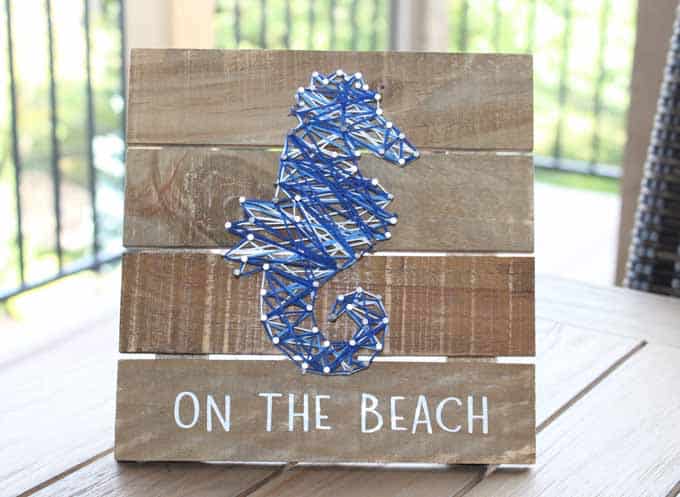
We decided if Uncle Justin doesn’t like it, we will just keep it for our own home! The final result was lovely string art with just a little bit of effort.
RELATED: How to Make Wood Bead Garland
I hope you enjoyed today’s project. Have you ever made any nail and string art? If you have some string art tips, please share!
We made a string art Valentine’s Day card with red yarn last year. Of course, no nails were used, but it was pretty darn cute! AND, we also made a fun string heart banner. Clearly I have a thing for string art crafts!
Looking for more ideas or patterns for a simple diy string art project? Try these:
• A small heart for Valentine’s Day
• Shamrock templates for St Patrick’s Day
• Easter Egg Templates for Easter
How to Make String Art: A Beginner's Guide

The perfect project for all skill levels. String art tutorial.
Materials
- Embroidery floss
- Wood board
- Pattern for string art
- Wire Nails
Tools
- Hammer
- Scissors
Instructions
- Select pattern. Find a simple pattern and print it on a piece of paper. Ideas are hearts, state patterns, easy shapes, etc.

- Hammer nails around border of pattern for outline. Use wire nails to pound nails into wood board along the outline. Then remove piece of paper leaving nails intact.

- Tie floss on nail and begin string art. Complete a basic outline of the shape, then continue with string art in a zig zag until it is as full as you'd like. Change colors if preferred or stick with one color.

- Cut off excess string. Ensure knot is secure and trim away excess string.

- (Optional) Add words or phrases. Use acrylic paint or a cutting machine to add a fun phrase to your string art sign.

Notes
If you have never completed string art, start with a simple design!


Hi, I am so glad to find this craft and instructions. I would like to ask permission to use these instructions for the craft during my camp out this summer
my email is [email protected]
Absolutely, Tammy! I think it would be a wonderful camp craft. Enjoy!
Adorable.
Thanks! We had fun making it!
Love this art project. Now I want to set up a girls night with my daughter and make this. Fun memories for the two of you and a great gift to give!
It’s a perfect project for a girls’ night! We’ll need to have another craft night to make one for us 😊
This turned out so cute, she did such a great job! We loved the string heart banner project so we will definitely have to try this one!
Thanks so much, Jenifer. You always brighten my day;-)
That is adorable! I’ll have to hire her to create one for our future beach house. 😉
She’d love to, Jill! And, we’ll hand deliver it…to the beach house, not your current home;-)