Reverse Canvas DIY Signs // What Are They and how to Make Your Own!
I love an easy project that happens to also be beautiful! This reverse canvas DIY meets both requirements. It was simple and I think it is very pretty, too! The best part, though? It’s also an inexpensive DIY project!

This post contains affiliate links. Please refer for my disclosure policy for details.
See more easy craft projects here!
My Silhouette Cameo 3 has gotten a lot of use lately! Last week I showed you how to make buffalo plaid embroidery hoop ornaments AND I have several more posts that I’ll share soon using this amazing cutting machine.
But, even if you do not have a Silhouette Cameo or Cricut, the reverse canvas DIY is something you can do! Read on and I’ll tell you how.
If you are a crafter on any level, you likely have many of the below items in your craft supplies.
SUPPLIES NEEDED FOR REVERSE CANVAS:
- Artist Stretched Canvas. These can also be found at Hobby Lobby, Michaels, and most stores that carry crafts. These are the plain white canvases that are stapled onto a simple wood frame. They are typically very inexpensive.
- X-ACTO knife or other sharp knife
- Scissors
- Wood stain in color of choice (I used Minwax Special Walnut)
- Inexpensive paint brush for stain
- Drop cloths to protect floor from stain
- Silhouette Cameo or Cricut machine if using 651 vinyl or HTV for sign (more on that later!)
Other supplies if you will be painting your DIY reverse canvas sign using a stencil:
- Mod Podge
- Acrylic paint in color of choice
- Stencil
- Foam brush
Now, on to the fun part – Making your signs!
Steps for making reverse canvas DIY signs:
Keep in mind that this was my first reverse canvas project. I have already learned things I might do differently, so read carefully. You want your project to be worth your time. Learn from my mistakes!
Step 1: Determine size of sign you will be making:
I bought this multipack of stretched artists canvases over a year ago at Hobby Lobby. They just sat in my craft closet because I didn’t know what I wanted to do with them.
The buzz of “reverse canvas” got the best of me and I had to try it myself!
If your intention is to just experiment, start with smaller sizes and then you can work your way up to the bigger canvases.

Step 2: Remove the canvas from the wooden frame
My X-ACTO knife was perfect for removing the canvas. I promise this is easy.
Simply flip the canvas to the backside, and begin using your exacto knife (or other sharp knife) to cut away the canvas. You will make your cut just to the outside of the staples.

When all four sides of your canvas are cut, you will be able to pull the canvas away from the frame.
Be sure to pick off any remaining remnants of canvas from the staples on the frame.
I did NOT remove the existing staples from the backside of the frame. You will not be seeing this when your project is complete, so there was no sense in creating extra work.
That is just my opinion. If if bothers you knowing the staples are there, feel free to remove them;-)

Step 3: Stain your frame
This step is only necessary if you prefer the look of stained wood versus raw wood.
You will need to allow several hours (or possibly overnight) for your stained frame to fully dry, so plan for that.
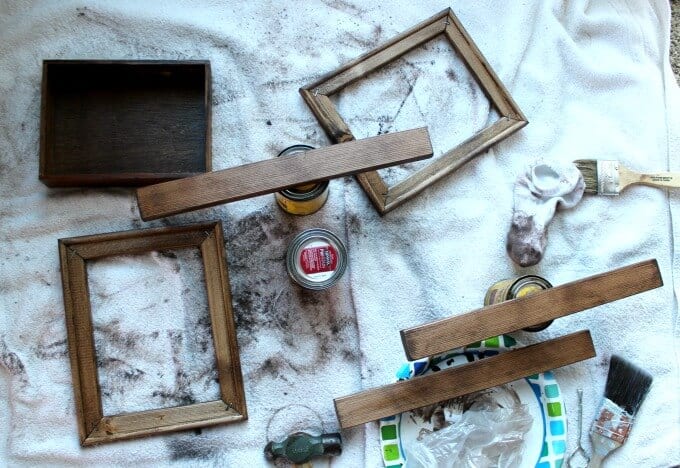
As you can see in the image below, I stained several other little wood projects at the same time as the frames.
I really despise cleaning. So if I can knock out several messy projects at one time, that is a total win for me! Clean it all up at once AND save yourself some time.
As I mentioned in my product list above, I used Minwax Special Walnut stain. It is a rustic color that goes great with the farmhouse decor look.
If you haven’t used wood stain before, this is what I would suggest for this particular project:
- Use an inexpensive paint brush to paint a light coat of stain onto the front side of the frame. NO NEED TO STAIN THE BACK- You will not see the back when you are finished so don’t worry about that.
- Be sure to get into all of the crevices and around the inside edges well.
- Paint the stain going with the grain of wood.
- After covering all of the frame with stain, gently / lightly wipe away any excess stain with a lint-free cloth. An old sock will work just fine! Don’t wipe too much or you’ll wipe away the stain.
- IF you want your stain to be darker, repeat the above steps after letting the stain dry for 30 minutes or so.
A side note: With most of my staining projects I usually prefer to use a pre-stain wood conditioner prior to staining. This allows for a more even stain.
BUT, with this particular DIY I didn’t feel it was necessary. More of a rustic look was the goal and I think that was achieved.

STEP 4: Make your sign using your Silhouette
The Faith Cross Phrase was used for my sign. This is a SVG file that can be purchased at the Silhouette Design Store. This particular design is for personal use only, meaning it’s not for commercial use.
Funny story, my husband didn’t realize it was meant to look like a cross. He kept wondering why I was displaying my “faith” sign on it’s side!
When making your sign, it’s important to measure the space that will be open inside the frame. Keep your design that size!
Also be sure to allow for space around the edges of the sign so it will look great in your frame.
If you are new to your Silhouette, Vintage Gypsy has a great tutorial to get you started. Until I get a few more projects under my belt, I will spare you my explanation of how to use the cutting machine.
You might be asking: Should you use HTV (heat transfer vinyl) or 651 vinyl?
That is a great question. For this project, I obviously used HTV. But I read a great post at Rachelteodoro.com that shares a secret for getting 651 vinyl to stick to canvas.
Hint: It involves spray adhesive!
I am looking forward to trying her trick myself. I’ll keep you posted;-)
STEP 4 ALTERNATIVE TO VINYL
As I mentioned at the beginning of the post, you could paint your sign using a stencil if you do not have a Silhouette Cameo or Cricut.
Making Manzanita has a good post / tutorial for stenciling on wood, but I think it would apply to canvas. The concern would be bleeding of paint around the stencil. Her tips would likely prevent bleeding of the paint, but I can’t guarantee it.
A brief summary of what I would do if painting a design on canvas:
- Hold stencil firmly in place
- Go over stencil with Mod Podge, using your finger for application. The intent of the Mod Podge is to give a smoother surface for paint.
- After allowing dry time of the Mod Podge, paint your design / words onto your canvas sign using acrylic paint. Be sure to off load your brush and do a couple light coats. I’ve done LOTS of stenciling on other surfaces (my stenciled basement tile floors, stenciled terra cotta pot, and reusable gift sacks) to name a few!) and the key is NOT to have a lot of paint on the brush.
DISCLOSURE: I haven’t tried to paint on canvas yet, but that is what I would do if I didn’t use my cutting machine. If you try it, please let me know how it turns out!
Step 5: Iron / transfer your design onto the canvas:
A word of warning: Make sure your canvas AND sign is straight before ironing it!
Ummmm…oops!
I just had to ensure there was enough canvas to reach the back edge of all four sides of my frame. Luckily there was.
Thank goodness!
Once you center your sign, hold the canvas in place and flip it over to the backside for the next step.

Step 6: Staple the canvas to the frame
An old stapler was used to do this. Since completing this sign, I have purchased a staple gun as I think that would penetrate the wood a lot better.
I’ve always wanted a staple gun anyway. As I was searching for one to purchase, I wondered how I’d made it this far in life without one.
A bit dramatic, perhaps! 😉
I would suggest a few things when stapling:
- Start at the top
- Pull the canvas taut and staple at the bottom
- Staple on one side
- Pull taut again and staple on the other side
- Continue to keep it as tight as possible and continue stapling around all sides.
I did NOT do this as well as I should have. When my staple gun arrives, I might just pull these staples out and try again. If not, it’s still good enough!

Step 7: After all staples are complete, cut and remove excess canvas
Using your X-ACTO knife again, cut around the staples to remove the excess canvas.
As you can see, I did not get fancy here.
The goal is to remove the excess canvas so it will not show when viewing sign from the front.

Step 8: Put a picture hanger on the back
Use your favorite type of picture hanger for the back. Command Hooks would even work well!
These canvas signs are incredibly light so that gives you a lot of flexibility for hanging.
Step 9: Admire your handy work with the beautiful reverse canvas DIY sign you just created!
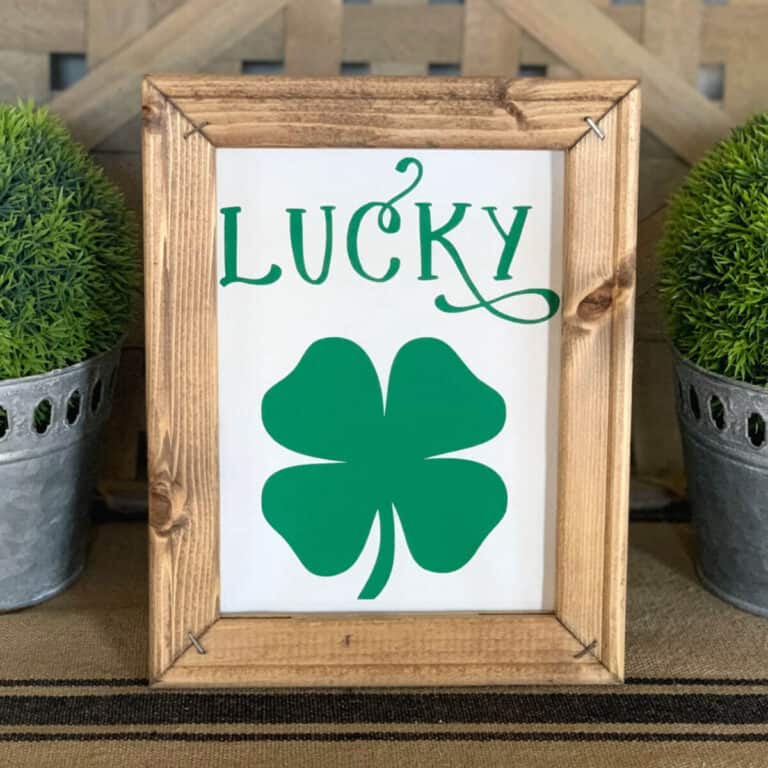
As you can see below, the staples on the front of the frame show. But, I honestly do not mind them.
IF you wanted to remove them, you could do so and fill in the holes with wood putty prior to staining. But, I’m all about ‘good enough’ these days!

Super cute. Super easy.
Thanks for sticking with me today! It was a long post!

Don’t forget to PIN this to your favorite DIY Pinterest board as a reminder!
Follow me on: PINTEREST / INSTAGRAM / FACEBOOK


Oh wow! This idea is so cute and original. We got a set of 10 canvas on sale earlier this year and I have been wondering what to do with them. This might just be the thing…and would make a wonderful Christmas gift!
I’ve already given several as gifts since this post came out. They are a fun way to personalize a gift on a dime! Have a great Christmas, Jenny!
As the recipient of one of these gifts, I can say it’s truly unique and beautiful! Thanks so much, April, your creativity amazes me!
Awww, thanks for this sweet friend. I’m so glad you like yours, Alissa!
LOVE this! I’d love to have this sign in my house right now! Thanks for the tutorial 🙂
Awww, thanks Nicole! My pleasure!
This is awesome! It looks amazing and is so simple to do. I would have never thought of using the canvas backing as a frame, but makes perfect sense.
Reverse canvas is such an inexpensive way to get a print and frame. With just a little bit of effort you have a personalized sign! Have a great week, Emily!
I love these! Thanks for breaking it all down for me!
These are so cute! I love how yours turned out!
Thanks so much, Amy! Have a great week!
Wow! What a fun project! I love who detailed this post is. Thank goodness your directions are conscise and easy to follow. This is a really creative idea to turn a regular canvas into something so original. I can’t wait to try it myself. I like the staples in the front. I think it adds a nice touch. I love anything that gives me a reason to break out the staple gun.
I’m glad it’s easy to follow! Just tried my staple gun for the first time today. Not sure why I’ve waited this long to get one…it’s awesome!
What a neat & beautiful idea. These would make great gifts. Thank you for sharing the step-by-step.
My pleasure, Wendy! Have a great week!
This is so amazing! So simple and beautiful, I can’t wait to make my own!
They are so simple! I just made six as coworker Christmas gifts!
These would make great Christmas presents. They look fairly easy to do, too!
I’m making several for Christmas presents, Andrea! So, I definitely agree! Have a great week!