How to Make DIY Christmas Gnomes: No-Sew Sock Gnome & Easy Sew
These cute little Scandinavian Christmas gnomes, sometimes called Swedish or Nordic gnomes, are beyond adorable. I’m including instructions for you to make your own NO SEW style using a sock or using basic sewing skills. Either way you go, you will absolutely love them and want to make more!

Get more Christmas DIYs as well as general craft ideas here!
My inspiration for these DIY gnomes was found when I was shopping at a local boutique, Very Violet. I’ve mentioned them in several posts over the years because they have the cutest home decor.
I highly recommend that you find a place that inspires you to create a home you love! Plus, it’s great to get out and support a local business.
My Christmas gnome inspiration:
These cute gnomes look a bit like Santa Clause with their white beard.


Let me just say, if you are in the Kansas City area, just stop by this quaint home decor shop and snatch up a few of these gnomes.
But, chances are good you don’t live around here. SO, I’m going to teach you how to make your own!
I’ll show you a couple different ways to make Christmas gnomes. You may even get some ideas to personalize yours and make a different twist in your gnome creation!
By the way, this year I am honored to join the Deck the Homes Holiday Challenge! An amazing group of DIY bloggers have come together to share various holiday DIY how-to’s for several weeks.
Be sure to read all the way to the bottom of this post where you can peruse all of their fun DIY holiday decor that can be completed in less than 2 hours (that’s this week’s theme!).
NOW, back to the Christmas gnomes.
If you don’t sew, the first tutorial option using a fuzzy sock is for you! The second option requires some basic sew skills. Both are easy, no worries!
OPTION 1 – DIY NO SEW CHRISTMAS GNOMES USING SOCKS
Time required: <30 minutes
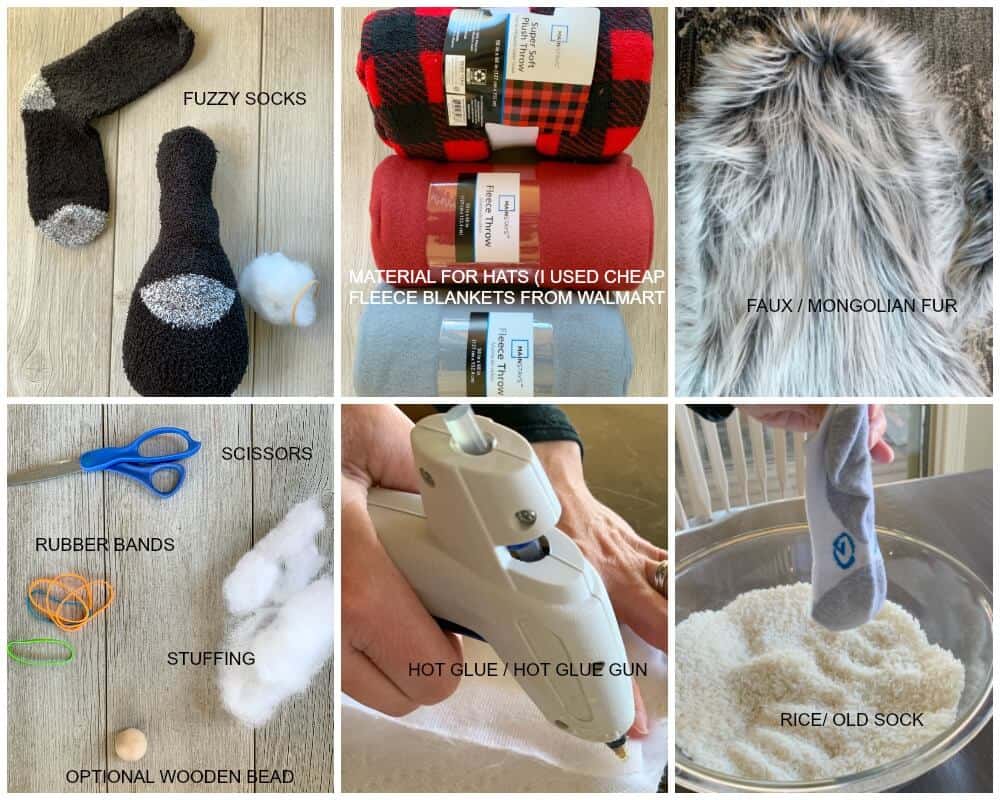
Supplies for No Sew Christmas Gnomes made with SOCKS:
- Material for hat (see my suggestions below)
- Plain, old sock to hold rice
- Fuzzy socks for body
- Stuffing for bulk in body
- Mongolian/faux fur fabric
- Rubber bands
- Hot glue gun / hot glue
- Rice
- Scissors
- Optional – wooden bead for nose
Tips to save you money on your gnome supplies:
- For the hat material: WalMart has fleece blankets for $2.50 a piece at the time of this article. This is where I got mine and they had several colors that would fit for the Christmas holiday.
- Don’t buy new socks for holding the rice! Go through your sock drawer and grab some older ones (without holes as they are intended to hold rice) that you’ve been meaning to replace anyway. The color of your plain sock doesn’t matter one bit, any basic sock will do.
- For stuffing: If you have any outdated pillows you’ve been meaning to toss, use the stuffing in them for this project. It’s a great way to save some cash and repurpose!
- Faux fur: This can get expensive. If you are only planning on making a few gnomes, 1/2 yard should work just fine. I loved the faux fur with a couple of different color tones, but get what you love! Before ordering online, check to see if your local WalMart, Hobby Lobby, Dollar Store, or JoAnns has any in stock.
- Nose: The wooden beads are really cute as noses. But, to save money you can easily make these gnomes without the beads, which I’ll get to shortly. IF you love the wooden nose look, you might try looking at your local craft store such as Michaels or Hobby Lobby to get a better price than my Amazon link listed in the supplies section of this post! I did find the 1.25 inch wooden bead to be a great nose size.
DIY (NO SEW) Sock Gnome Instructions:
Once you have all of your supplies gathered, this project can be completed in about 30 minutes from start to finish.
1. Fill plain sock with rice and close top of sock with rubber band.
You really need a durable sock to hold the rice as the fuzzy sock would allow the rice to come through.
I tried to use a funnel for filling the sock, but the rice moved too slowly. We ended up just pouring it. If you have a helper, this is a lot easier. My daughter made these with me and we breezed through many of the steps. Plus, it was great mother/daughter time;-)
Just when you think you have enough rice, add some more. Shake your sock to help the rice settle between pourings.
When you get the body to a good size, use a rubber band to tie off the top of the sock to ensure your rice stays contained.

2. Cover plain sock with fuzzy sock
Simply slide the plain sock into the fuzzy sock. I used the heel area to create a nose for the gnome.
RELATED: How to Make a Wood Peg Gnome Christmas Doll
3. Make the nose
Some options for your nose:
- Make as I did using filling in the fuzzy sock and close off with rubber band (see instructions below)
- Use rubber ball in fuzzy sock, closed off with rubber band
- Wooden bead glued onto sock
After the white sock was successfully inside the fuzzy sock (the body of the gnome), I put stuffing inside the fuzzy sock, right at the heel and tied it off with a rubber band to create a big round nose.
You could also use an old rubber kids bouncy ball for this! My daughter did that on hers.
Use a rubber band to close the top of the fuzzy sock as well after inserting the plain sock!
Don’t worry about contrasting fabric showing around the edges of the nose. All of this will be covered by your gnome’s beard later.

Should you decide to use a wooden bead for nose:
If you prefer a wooden bead for the nose, simply hot glue it in place, about the level of the heel of the sock. After gluing, be sure to hold it in place for several seconds to ensure a good adhesion.
As I mentioned above, don’t worry if the heel is a different color if you decide to use a wooden bead.
The beard will cover the majority of the sock on the front side and if you elect to put the heel on the back side the hat will likely cover it.
4. Make the beard
I love a good craft, but I am no artist. Free-hand drawing the beard will work just fine. Draw a “U” or long-tongue shape and this should work.
Don’t overthink this!
I don’t have a pattern to share, but you really don’t need one. I promise. If you look at my drawing, that should give you comfort to know yours will turn out great;-)
To measure the width and length of the beard: Width: simply measure from one side of the fuzzy sock to the other.
Think from ear-to-ear. Length: Measure distance from top of nose to bottom of sock.
TIP: Use caution when cutting out the beard. This faux fur is challenging to cut. You want to avoid an overly trimmed beard for these nordic gnomes! Clean cut just isn’t their look.
It helped me to determine where I would cut, then pull the fur away from the cut line.

5. Hot glue top edge of beard onto gnome
TIP: Be incredibly careful using the hot glue. I burned myself a few times!
Apply glue to top edge of beard.
Then, tuck the beard directly under his nose, curving edges slightly upward so the hat (we’ll get to that in a moment) will cover the sides of the beard.
Press and hold the beard in place to allow hot glue to dry somewhat.

6. Make DIY gnome hat
Use your material of choice. As I mentioned earlier, fleece blankets can be cut into hats on the cheap.
Felt is another great choice for gnome hats.
Pick what YOU like. If you already have some fabric that would work, perfect!
- Measure (roughly) around the diameter of the gnome for the width of the hat. Then add a couple of inches as it’s easier to cut it down if it’s too big than deal with a hat that is too small. For reference, my sock gnomes’ hats were approximately 11 inches tall by 11 inches wide (at the bottom).
A couple different ways (both easy) to make these hats.
TIP: It’s best to use the edge of the blanket for the bottom of the hat so you already have a nice hem that you don’t have to bother with!
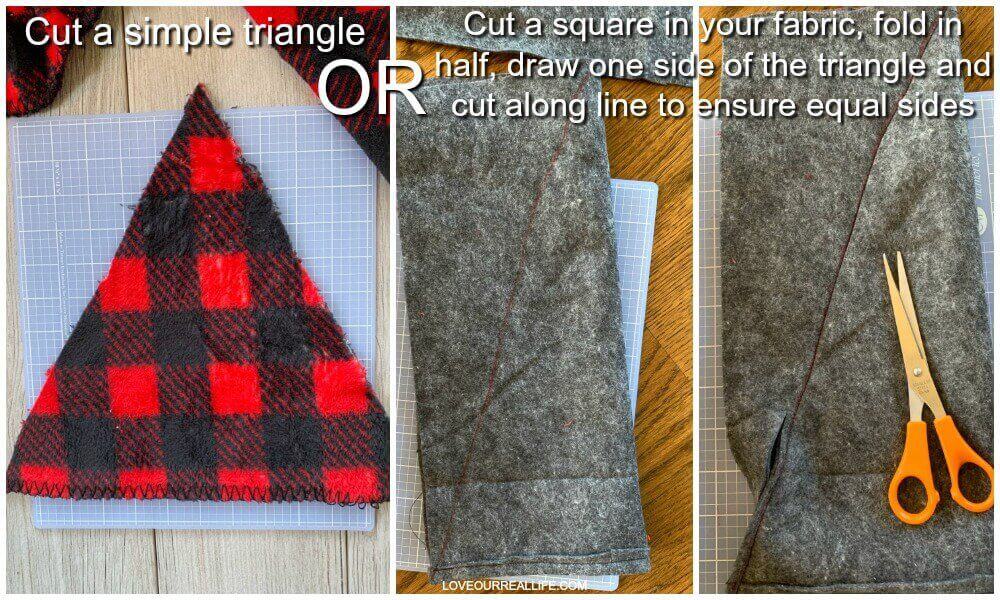
- Draw a simple triangle if you are fairly good at free handing.
- OR (if you are not good at free hand drawing), cut out a square in your fabric. Fold in half, then draw a line for one side of the triangle angling from the bottom outside edge of the fold to the top inside edge of the fold (see below). Then, cut along your line for an even-on-both-sides triangle!
7. Hot glue hat onto gnome
Once again, be careful with the hot glue!
If you opted to use felt, it is a bit more sturdy than flannel or fleece. It will likely stand upright without much (if any) stuffing. I liked the stuffed hat look.
- Start by hot gluing the base of the hat to the gnome, tucking the center of the hat under the top of nose. Hold hat in place several seconds to allow it to dry. Make your way around the head, gluing the hat into place.

- Next, use hot glue to glue all the way up the back edges of the hat. If you’d like a hat that stands upright, add stuffing as you go!
I cannot stress enough: be careful with the hot glue!

DIY Sock Gnome Completed
Like it? Please Pin it!

RELATED READING...Christmas Gnomes You Can Purchase on Amazon
Now onto the basic sewing version of Christmas gnomes!
If you are looking for other easy sewing projects that are perfect for the holidays to tackle when you have your sewing machine out, you should check out:
Related Easy Sewing projects
- Envelope Pillow Cover Tutorial
- How to make gift sacks with fabric
- No Sew Fleece Blanket (ok, this is a “no sew” project, but fabric is involved and I think you’ll love it!)
Get Access to the FREE Printables Library
When you join our newsletter!
OPTION 2 – SIMPLE SEW CHRISTMAS GNOME
Time required: ~ 1 hour
How to Make Easy Christmas Gnomes with Basic sewing
Even if you have just the most basic sewing skills, you can do this.
Some of the steps are very similar to the sock version of the gnomes. So, occasionally I’ll refer you to a particular step above.
Let’s get started!
Gather supplies for the simple sew version of Christmas Gnomes
- Material for hat, mittens, and body (you can use just one fabric or choose something different for hat and mittens)
- Ziploc bag to hold rice (quart size is what I elected to use)
- Stuffing for bulk in body (as I mentioned above, if you have an outdated pillow you were planning on tossing just use the stuffing in this to save a little cash!)
- Mongolian/faux fur fabric
- Hot glue gun / hot glue
- Rice
- Scissors
- 6 inch bowl to trace base of body
- Wooden bead for nose
- Sewing machine (this is my sewing machine) and thread to match fabric selection
Simple Sew Gnome Tutorial:
1. Create round base for gnome
Draw a circle for the base. To keep it simple, trace around a 6″ bowl for the base of your gnome.
Cut out the circle, leaving approximately 1 inch around your tracing. We’ll get back to this in a quick moment.

2. Make Torso of Gnome
I wanted a short, chubby gnome. So, if that’s the look you are going for, use my measurements.
Cut out gnome body
Cut two 11×11 inch squares. Then trim the edges to make squares slightly more narrow at the top. The image below helps this to make sense (I hope)! Essentially, you are making it look more like a body.

Sew sides of gnome body
- Place pretty side of fabric together, facing the inside. Pin together edges of sides only. You will not be sewing the top or bottom at this time.
- Sew sides of body together using basic seam
- When you are finished with this step, it should look like a tube

Next you will sew the round base to the torso. Since my sewing skills are super basic, I followed a tutorial at Makeit-Loveit that was incredibly helpful in showing how to sew the circle base onto the tube body.
Her tutorial is for making a bucket bag, but it worked great for these little guys! You’ll definitely want to take a peek at her instructions, but this is the jist:
Sew circle (base) onto tube (gnome body)
- Pin circle onto body, ensuring good side of fabric is facing inside.
- Sew seam along edge to attach circle to tube.
- When finished, turn right side out.

3. Place rice (in ziploc bag) and stuffing in gnome body
- Put rice in a ziploc bag. Place in base of the gnome to give a little weight to the bottom. How much rice, you ask…I didn’t measure. It was just enough to give the gnome some stability when standing. ~ 1/2 of a quart size ziploc bag.
- Add stuffing around rice bag as well as throughout rest of body. This guy is going to be pretty chubby!
- Once stuffing is in body, use hot glue around the top

4. Make the arms for gnome
- Cut two equal sized fabric strips for arms. Mine were cut at 4 x 9 inches. If you want arms wider than 2 inches, make the appropriate adjustments. Also note, my arms were too long for this gnome’s body, but it worked out ok.
- Sew a seam along the bottom to make a clean edge at the gnome’s wrist.
- Ensure the good/pretty side of the fabric is together and fold the arms in half lengthwise.
- Sew a seam along the long edge of the arms.
- Turn right side out.

5. Make the mittens for gnome
- If you have decent drawing skills, free hand draw a mitten that is similar in size to the arm you just made.
- Should free-handing not be for you, google images of mitten clip art. Size it to fit the arms and use it as a pattern.
- Sew around drawing of mitten.
- Cut out mitten.
- Turn right side out.

6. Attach mitten to gnome arm; Attach arm to gnome body
- Before attaching mitten to the arm, be sure to add some stuffing!
- Hot glue mittens inside arms.
- Hot glue arm onto body. BE SURE ARMS MEASURE EQUALLY ON BOTH SIDES

7. Glue nose onto gnome body
Not much to this step. Just place it at the top of his body in the center. Apply hot glue to the nose and hold firmly in place for several seconds.

8. Make beard and attach to gnome
*See step 3 and 4 from the no sew portion of the gnome making tutorial above.
But, I’ll summarize here.
Faux fur is perfect for these beards! It can be difficult to cut, though. So, take your time with this.
Just as you would for a sock gnome, you can draw the beard outline on the backside of the faux fur fabric.
- Measure from one side of the gnome body to the other to give you a general width.
- Measure from top of nose to bottom of gnome body for length.
- Cut very carefully around your “U” drawing. It helps to pull the fur away from where you will be cutting to avoid cutting fur. As I mentioned earlier, no one wants a clean cut beard on a gnome;-)
Glue beard to gnome.
Although the image below is me gluing a beard onto a sock gnome, the premise is exactly the same.
Really get the beard up under the nose and curve the sides of the beard upward slightly as you connect it to your gnome.
If you are working alone, it might work better for you to glue one side, then go back and glue the other.
9. Make hat and glue onto gnome
The most challenging part for this portion is making sure you make a large enough hat!
I ended up making a hat 18 inches wide at the base by 16 inches tall. It has to be able to wrap around the gnome’s body.
The size will really depend on how large your gnome’s body ends up being.
To give you an idea, measure around the top of the gnome body before you cut anything.
Here is a guide:
- Cut a square based on the width you have measured for your gnome’s hat. For perspective, my bigger gnome’s hat started as an 18×18″ square.
- Sew a simple seam along the bottom edge of the hat.
- Fold your square in half (your recent seam should be on the bottom here – see below) and draw half of a triangle, with your line going from the inside fold all the way to the bottom outside edge.
- Sew along the line. Cut away the edges of the fabric and turn your hat right side out.

*Optional: Add embellishments to the gnome hat.
I tried to replicate hand stitching a snowflake on my gnome’s hat with a needle and embroidery thread, just like the one I purchased. Not bad!

Add pillow stuffing to the hat and hot glue it carefully to your gnome.
Start with the center of the hat, just above or slightly over your gnome’s nose.
Hot glue it under the inside rim of the hat and press it against your gnome as you make your way to the back side.
Hold the hat in place for several seconds after applying hot glue to ensure adherence.
Then do the same thing on the other side.
You. Are. Done. So cute!
DIY Christmas Gnomes
There’s something magical about Christmas gnomes.
These adorable little creatures with their bushy gnome beards and pointy hats bring a whimsical touch to any holiday decor this Christmas season. The good news is you can easily make your own DIY Christmas gnomes to add a personalized touch to your Christmas decor.
You can even make cute Christmas gnomes into gnome ornaments and add them to your Christmas tree.
When it comes to making these charming little beings, the best part is that the possibilities are endless with this easy craft.
From using old socks and felt to repurposing wooden cones, there are countless craft supplies you can use for their bodies.
And don’t forget about their faces!
Embroidered eyes and wooden balls for a gnome nose can give them personality, while tiny accessories like miniature presents, pom pom hats, or candy canes complete the look.
One of the great things about making your own diy gnomes is that they can be customized in so many ways. Whether you prefer traditional red and white gnome outfits or want to experiment with different color combinations, the choice is yours!
Girl gnomes, mini gnomes, gnomes with braids- so much fun with all the great ideas. You can also experiment with varying sizes when making your own Christmas gnomes– create a family of little gnomes ranging from large to small for an added visual interest on your mantelpiece, front porch, or tabletop display.
So why not unleash your creativity this holiday season and try making your own adorable diy gnomes? Not only will you have fun in the process, but you’ll also end up with unique decorations that will add joy and warmth to your home during this special time of year.

Christmas Gnomes DIY
Perhaps mine didn’t turn out quite as good as someone with professional sewing skills (gnome on far left in the below photo), but they are still pretty cute.
There are so many ways you can get creative and personalize these sweet little nordic guys.
Add legs, make a lady gnome with braids, pom poms on top of the hats, fur around the mitten/sleeve area, endless color combinations!
Looks like I might be making more;-)
My daughter and I are trying to decide on names for ours.
She determined “Schlotzsky” might be fitting for the plump guy with the mittens on the right. We were hungry when doing this project;-)

My initial inspiration: Swedish gnome on left

The sock gnomes with hats in a cone shape and pompom noses (made from socks, not pieces of yarn, although that would be easy too!):

Sock gnomes on stand and simple sew version of Christmas gnome on right:

The craft fur is SO cute with the wood bead nose! If you have fabric scraps you could get started with your gnome today.
Do you love Christmas Gnomes? Leave a comment below and tell me!
If you love this little guy, I have several other holiday gnome options for you.
A girl gnome for a fun Valentine, a cute gnome ornament, and more. If you are not ready to make gnomes, I also have options for gnomes you can buy.
Christmas Gnomes: How to Make Gnomes

Follow these step-by-step instructions to make DIY Christmas gnomes using a sock. For a slightly more advanced tutorial that requires sewing, see the accompanying post.
Materials
- Material for hat such as felt
- Plain, old sock to hold rice
- Fuzzy socks for body
- Stuffing for bulk in body
- Mongolian/faux fur fabric
- Rubber bands
- Rice
- Optional - wooden bead for nose
Tools
- Hot glue gun/hot glue
- Scissors
Instructions
- Fill plain sock with rice and close top of sock with rubber band.
- Cover plain sock with fuzzy sock.
- Glue wooden bead for nose.
- Make the gnome beard. Use a razor blade or scissors to cut faux fur.
- Hot glue beard to gnome.
- Make a DIY gnome hat from flannel or felt. Cut in shape of a triangle and carefully hot glue edges. For something a little extra, add a pom pom to top of gnome hat.
Notes
For more details, see indepth tutorial in blog post.
Don’t forget to PIN THIS to your favorite Christmas Pinterest board for later

Get Access to the FREE Printables Library
When you join our newsletter!


LOVE THEM!! Exactly what I have been looking for. Funny thing, I had been thinking how to create one so went to Jo Ann and purchased what I thought I would need and I have everything. Even looked at the plaid you made one from but chose a Nordic design.
Thanks so much
It was meant to be! Best of luck, Cathy…you’re definitely going to love them!
These are darling. I actually bought 3 of them last year but they fell victim to an exuberant puppy. All were trashed! This year the pup is now slightly less exuberant and I can replace with my own version. Thank you!
Oh, Kathy! This just made me laugh. I put mine up pretty high so my dog wouldn’t be tempted! Good luck with your gnomes this year!
I love my new gnome friends! I made them for my daughter and now I have to make more! Gnomes for everyone!
I love this! They are so adorable! Once you start making them, you really do want to make more. Enjoy;-)
I loved this Tutorial. It is so informative and easy to understand. I will definitely be trying the first one as I can’t sew. They are so cute. I love the nose made from the heel of the sock, such a good idea. Thank you for the easy-to-follow images and instructions. Merry Christmas from Ireland.
What a sweet comment, thank you! The gnomes are the cutest. Truly one of my favorite craft DIYs. Have a wonderful Christmas!
These guys are too cute, so much fun!!
Thanks, Katrin! They were super fun to make!
Aw I’m really digging these gnomes! I Think we may need some for our house!
They’re pretty cute, Danielle;-)
Oh my goodness!!! The gnomes are simply adorable and perfect!! Love them!
Thanks for the sweet comment, Christine!
I absolutely love these gnomes! Pinning and adding to my Christmas round up for the challenge. 🙂
So kind of you, Stephanie! Thanks for stopping by!
These are just adorable! I will be following this tutorial to make some. I’m so glad you have no sew directions. They just make me smile.
Thanks for the sweet comment, Jenny! They really are cute little guys;-)