How to Achieve a Faux Wood Finish with Paint- Step-by-Step Guide
A faux wood paint finish is a cost-effective and creative way to transform furniture and home decor into pieces that look like natural wood. Seriously!
This technique is great for updating an old piece of furniture or giving a new item a rustic charm. Faux wood painting allows you to replicate the rich textures and patterns of wood grain using simple tools and techniques.

In this guide, I’ll walk you through the easy steps to create a beautiful faux wood finish that will leave your piece of furniture looking like stained wood, using paint.
Technique I Used to Create a Faux Wood Look
Retique It is a game-changer when it comes to achieving a realistic faux wood finish on furniture and other surfaces.
Unlike traditional paint, Retique It is a liquid wood coating that contains real wood fibers, allowing you to transform any surface—whether it’s metal, laminate, or painted wood—into something that looks and feels like genuine wood.
The product is easy to use and requires minimal prep work, making it perfect for both beginners. Once applied, you can stain it just like you would with natural wood, giving you the flexibility to customize your piece with a wide range of stain colors.
To use Retique It, simply brush on the liquid wood with a paintbrush, just like you would with regular paint. The product goes on smoothly and dries quickly, creating a thin layer of real wood on the surface.
After the coating is dry, you can apply your choice of wood stain to bring out the natural-looking grain patterns.
The results are incredibly realistic, making it difficult to tell that the piece wasn’t originally made of solid wood.
Retique It is perfect for updating old furniture, cabinetry, or even larger projects like doors and walls, giving your space a refreshed look without the hassle of stripping or refinishing real wood.
Ok, now let’s get into the detailed step-by-step, including photos, so you can do it yourself!
Supplies
- Denatured alcohol (or rubbing alcohol), water, and clean rags to clean surface.
- Wood filler or Bondo if needed for filling holes or scratches.
- Quality paint brush.
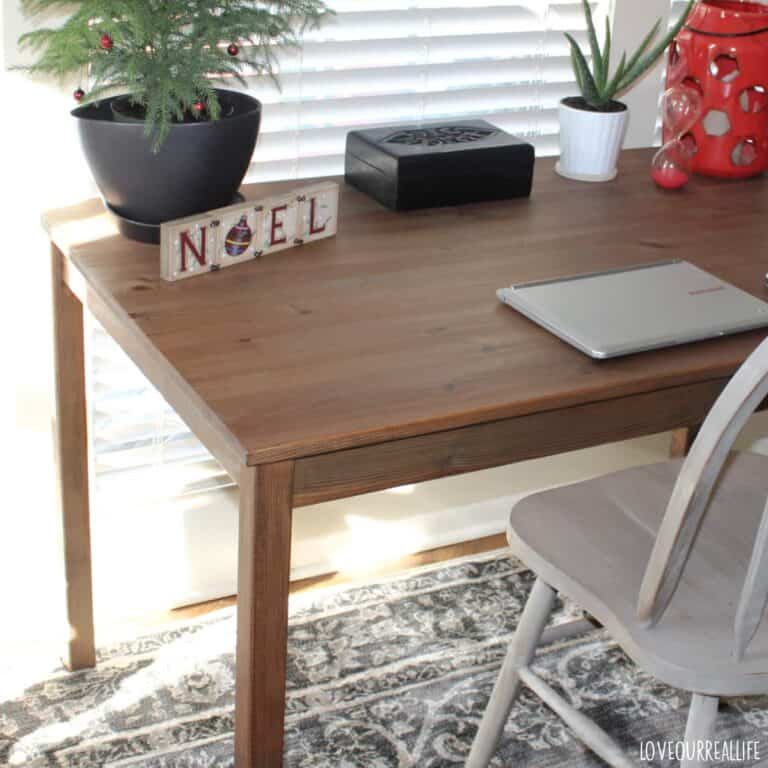
- Retique It Wood Kit in your preferred color includes primer, gel stain, and graining tools. For the coffee table project featured in this post, I used the Pickled Oak kit. Instead of using the Pecan stain that comes with the kit, I opted for the Dark Oak gel stain to achieve a deeper, darker color.
Note, These are the steps I used and found to be very successful. However, I recommend checking the Retique It website for more detailed instructions and guidance, as I’ve been known to skip a step or two occasionally! 😉
Prep the Furniture
Before diving into creating a beautiful faux wood finish, it’s important to properly prep your furniture.
This crucial step ensures the paint adheres well and results in a long-lasting, professional-looking finish.

It’s hard to tell from the picture, but this coffee table was in rough shape. However, it was still solid quality, so it definitely deserved a makeover!
Be sure to check out How to Re-Stain Old Leather Furniture
Clean the Piece
Start by thoroughly cleaning the piece to remove any dirt, grease, or grime. A simple and effective cleaning solution is a mixture of 1/2 cup denatured alcohol or rubbing alcohol and 1/2 cup water.
Use a soft cloth or sponge to wipe down the entire surface, making sure to get into all the nooks and crannies. The rubbing alcohol will help cut through any residue while evaporating quickly, leaving your furniture clean and ready for the next steps.
Fill Holes and/or Scratches
Once your furniture is clean, inspect it for any damage like scratches, dents, or holes. Use a good-quality wood filler to fill in any imperfections.

Apply the filler with a putty knife, then let it dry according to the product’s instructions.
After it has fully dried, sand the patched areas with fine-grit sandpaper until they are smooth and level with the rest of the surface.
This will create an even base for your faux wood finish.
Sand If Piece is Glossy
If your furniture has a glossy or shiny surface, it’s essential to scuff it up a bit to give the paint something to grip onto.
I’ve used this technique now on several different areas of my home, and I can attest that this is a crucial step, otherwise the paint will peel.
Use a medium-grit sandpaper (around 120-150 grit) to lightly sand the entire piece.

You don’t need to sand down to the bare wood; just focus on removing the shine. The goal is to create a slightly rough texture, often referred to as “teeth,” which helps the primer and paint adhere better.
Wipe Down and Let Dry
After sanding, wipe down the piece with a damp cloth to remove any dust and let it dry completely before moving on to priming and painting.
Proper preparation may take some extra time, but it will significantly improve the durability and appearance of your faux wood finish, giving your furniture a fresh look.
Prime the Furniture
To get started, apply two light coats of Liquid Wood using a high-quality paintbrush, allowing proper dry time between coats.
For projects exposed to harsh weather or heavy wear, consider using Wood’n Primer instead of Liquid Wood for added durability. It’s designed to withstand tougher conditions, providing a longer-lasting finish. But, for all of my interior projects, Liquid Wood has been great.
Keep in mind, the first coat is pretty ugly, so don’t get alarmed. It will get better!

Be sure to use long, even strokes to achieve a smooth and consistent finish.
For the best results, allow the first coat to dry completely before applying the second. This usually takes about 30 to 60 minutes, depending on humidity levels. I allowed 1-2 hours just because to be certain and that worked nicely.
Applying two thin coats instead of one thick one helps avoid streaks or brush marks and ensures a more natural wood-like texture.
The second coat gives a nice surface for the upcoming steps!

The result is a beautiful, smooth surface that’s ready for your choice of stain.
Use Wood Grain Tool (Optional)
For an authentic faux wood finish, using a wood grain tool is a fantastic way to replicate the look of natural wood grain on any surface.
For this coffee table project I used the Retique It Pickled Oak kit.

I let the two coats of Liquid Wood dry completely. Then, after applying a thin layer of the Pickled Oak Wood’n Stain, work with the wood grain tool while the surface is still wet.
Start by dragging the tool in long, even strokes, using a slight rocking motion as you move to mimic the natural grain patterns of real wood. The tool’s design creates realistic lines and knots, giving your project a more textured and genuine appearance.
To achieve the best results, practice on a scrap piece of wood or cardboard first to get comfortable with the technique.

Personally, I used the smallest wood graining tool and it worked great for me.
You can adjust the pressure and angle of the tool to vary the grain pattern, creating a unique look each time.
Handy tip:
For added depth, you can layer different shades of stain or paint, using the wood grain tool between layers. This method allows you to customize the finish to match the exact wood type and color you desire.
Below is an image of the table after the Pickled Oak Wood’n Stain was applied, prior to staining with the Dark Oak gel stain.

Note: If you’re not a fan of the wood grain look, you can simply use Liquid Wood and apply the gel stain directly over it for a smooth finish. This method is perfect if you prefer a sleek, polished look. I’ve tried both techniques and love the results just the same!
Apply Stain
After prepping and priming your furniture, it’s time to apply the water-based gel stain to achieve that rich, wood-like finish.
For my coffee table, I decided to go with the Dark Oak stain. The Pickled Oak kit originally comes with Pecan, but I wanted a richer, darker tone to complement my living space. I’ve also used Black Walnut before and loved the result, but this time, Dark Oak was the perfect fit for the look I was going for!

Using a high-quality brush or sponge applicator, apply the gel stain in long, even strokes, following the direction of the wood grain for the most natural look.
The key is to work in manageable sections, keeping a wet edge to avoid streaks and overlap marks. Water-based gel stain dries quickly, so you’ll want to move efficiently but with a steady hand.
For deeper color, allow the first coat to dry completely, then apply a second coat using the same technique.
This method not only enhances the color but also gives your piece a more dimensional, wood-like appearance.

Remember to wipe away any excess stain with a clean cloth after a few minutes to prevent blotchiness and to help the grain pattern stand out.
Seal It
To protect your newly finished piece and enhance its durability, apply 1-2 coats of Tripletique top coat.
I prefer a matte sheen for most of my projects, but I’ll use satin when I want to add just a touch of shine to a piece.
This sealer provides a strong, clear finish that not only protects against scratches and wear but also adds a subtle sheen to highlight the beauty of your faux wood grain.
Using a high-quality brush or foam applicator, apply the top coat in long, even strokes, ensuring full coverage. Allow the first coat to dry completely before adding a second coat for extra protection, especially on high-traffic surfaces like tables or cabinets.

The result is a smooth finish that will keep your project looking great for years to come.

Conclusion
Achieving a faux wood finish is a fantastic way to transform furniture and decor with a realistic wood look, all while staying within budget.
With the right tools, materials, and techniques, you can create a stunning, high-end appearance that suits any space.

Whether you prefer a rustic, textured grain or a smooth, polished surface, the faux wood finish offers endless possibilities to elevate your home projects.