How to Apply Glaze to Furniture: Step-by-Step Guide
Applying a glaze on furniture can give it a rich, antique look.
Follow my step-by-step guide to apply glaze to wood furniture. Learn what materials and supplies you need, how to apply the finish, and how to prevent mishaps.

Find more painting ideas and tips as well as furniture makeovers here.
What is Furniture Glaze?
Furniture glaze is often used to give a look. of layers and dimension to painted furniture as well as cabinetry. Glazes can be clear, white, or dark and have a thinner consistency than regular paint.
Perhaps one of the most common uses of glaze for painting is to make a piece of furniture have an antique look.
Several years ago, glazed cabinets were all the rage.
Keep in mind, glazed furniture and cabinets can be somewhat trendy, so be selective in what you choose for this painting technique.
Glazes are also what many painters use when completing a painted faux finish as it really helps to show layers and depth, giving the entire piece a warm finish.
What Do You Glaze Furniture With?
There are a variety of glaze options available or you can even create your own glaze mixture or a custom glaze. I’ll share more about that later.
But in today’s tutorial, I will be using Rustoleum Transformations Decorative Glaze in Java Brown.

This antiquing glaze is incredibly easy to work with and can give a beautiful, decorative finish with very little effort.
Other supplies needed for this project include:
- clean rag (lint free) or cheesecloth
- Paint brush
- paper towels
How Do You Apply Glaze to Furniture?
It is important to ensure the paint on your furniture piece is completely dry prior to beginning the glazing process.
For this particular furniture makeover, I was experimenting with bleaching wood.
When the bleaching process was completed, I added a white wash to even things out a bit as the tables were a bit blotchy after sanding and bleaching.
The white wash was allowed to dry overnight prior to applying the glaze.
Applying the glaze is quite easy, but it is best to work in small sections for better control.
1. Apply Glaze with Paint Brush
This glaze is fairly runny. It’s a good idea to have paper towels around for accidental spills or drips.
Using a synthetic paintbrush, foam brush, or clean rag, apply the glaze in small sections. Ensure you get the glaze in any cracks, crevices, nooks and crannies.

Glaze gives a decent amount of working time to get into the details of the piece, so it is an easy process.
Also note, a little goes a long way!
RELATED: 25+ Furniture Before and Afters
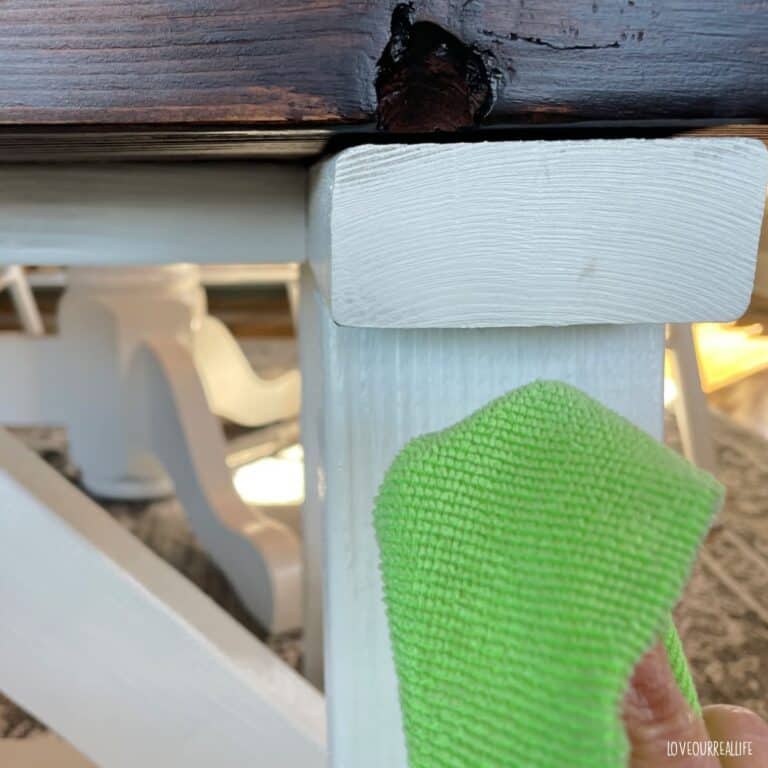
2. Wipe Away Any Excess
Using a clean, lint free rag or cheesecloth, wipe away any excess glaze.
On flat surfaces, ensure you are wiping with the grain of the wood. This is especially important if you are glazing over stained wood versus a solid paint color.
I wasn’t as careful with this as I should have been as you can see on this flat surface table top.

If you are working on a piece of furniture with detailed areas, be sure to wipe away the excess glaze in the crevices.
Remember, this is to help give a decorative look with natural looking shadows on your furniture makeover.
3. Allow Ample Dry Time Prior to Top Coat
Allow the glaze to dry for a minimum of 8 hours prior to adding your topcoat of choice.
Depending on the look you are hoping to achieve, you could use a clear wax or for a bit more durable finish, a polycrylic top coat is a good choice.
Polyurethane is another option for a very durable finish, but note it can often yellow over time.

For this piece, I didn’t even use a top coat! We use these as side tables in my living room and plan to use coasters.
Without sealing them, they have more of a matte sheen, which was what I was trying to achieve. Just note, this isn’t recommended for furniture that gets heavy use.
For furniture that receives heavy traffic, I would recommend a clear coat be used as a sealer to protect the surface.
Heavy traffic pieces are things such as a coffee table that gets a lot of daily use.

How Do You Glaze Wood Furniture?
The steps above are perfect for adding glaze to wood furniture. This simple process could also be used for wood cabinetry!
As mentioned, if you are using a glaze over stains where the wood grain is still visible, ensure you wipe away the excess glaze with the grain of the wood for a more natural end result.
How Do You Apply Glaze Over Paint?
The process of applying glaze over a solid paint color (with chalk paint, mineral paint, or any color of latex paint) is the same as stated in this tutorial.
Apply the glaze with a brush, wipe away excess glaze, allow to dry prior to sealing with poly or any other top coat.
Can You Use Glaze Over Stained Wood?
You can absolutely apply glaze over stained wood. This is exactly what I did in this project over a white wash stain.
As mentioned, if using a glaze over stain on wood, ensure you wipe away excess going with the grain of the wood.
How Long Does Paint Need to Dry Before Glazing?
Paint should be fully dry prior to initiating the glazing process. Waiting 8+ hours or overnight allows sufficient time to ensure the paint is fully dry prior to glazing.
How to Use Clear Glaze
If you have a clear glaze, you can mix any color of paint you would like with it.
A popular clear glaze in the world of diy furniture makeovers is Fusion’s Clear Glaze.
Custom glaze color is created by adding a bit of your paint color of choice into the glaze.
It is best to mix this in a bowl versus mixing it in the actual glaze container. A little bit of glaze will go a long way so you’ll find you really don’t need much!
Once mixed, the application of this custom glaze is the same as I outlined above.
FAQs
Stains penetrate the wood surface while a glaze sits on top of the paint or stain.
A wood stain typically has a more consistent overall appearance while a glaze results in a look with more depth and layers to a furniture piece.
You can apply glaze over nearly any kind of paint including chalk paint, latex paint of various sheens, acrylic paints, etc.
How to Apply Glaze to Stained or Painted Furniture

Learn how to use furniture glaze to give your stained or painted wood furniture makeover a beautiful antique look.
Materials
- Glaze (Rustoleum Transformations Glaze in Java Brown)
- Clean rags or cheese cloth
- Paper towels
Tools
- Paint brush
Instructions
- Apply glaze to one small section at a time with a paint brush. Glaze is someone runny, so have paper towels ready for possible spills. If applying to furniture with detail work, ensure you get the glaze in all the nooks and crannies to really bring out these areas.
- Wipe away excess with cheesecloth or clean rag. Wipe with grain of wood if applying glaze over stained wood. Remove all excess glaze.
- Allow to thoroughly dry before applying top coat (if desired). Allow dry time of 8+ hours prior to adding top coat. I opted to not use a top coat to seal this particular piece. But if you are finishing a piece with heavy traffic/daily use, consider polycrylic, wax, or a top coat of your choice.
Notes
Ensure piece is fully dry (if painted or recently stained) prior to applying the glaze.