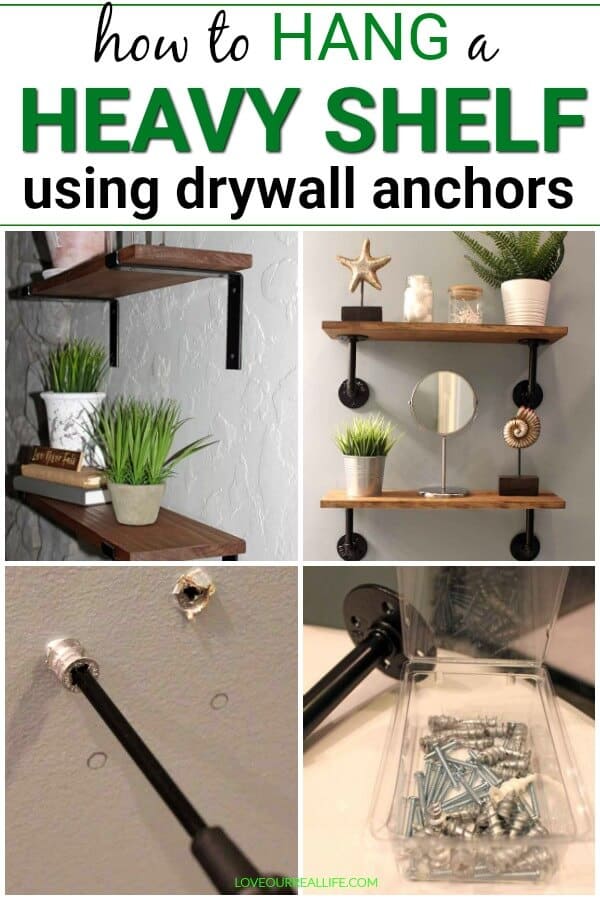
Installing Heavy Duty Shelves Using Dry Wall Anchors
The thought of installing heavy duty shelves using drywall anchors used to intimidate me! But, we made some DIY Rustic Shelves a couple of years ago and it honestly wasn’t as hard as I thought.
Since then, I have used dry wall anchors for hanging curtains, heavy mirrors, wall hooks, and large wall art. It’s nice to know what you are putting up is secure.
With all of the basement makeovers we’ve been completing the past several months, I knew more farmhouse shelves were definitely going to be in my future. No surprise, we hung them using dry wall anchors.
I’ll walk you through how I made my industrial shelves as well as how to use dry wall anchors to ensure they are secure.

See more diy home decor projects here.
This post contains affiliate links. Should you make a purchase after clicking through one of my links I might make a commission at no extra cost to you. Please see my disclosure policy.
Supplies for installing heavy duty shelves using dry wall anchors as well as staining the boards:
- Brackets for shelves (Below I describe and link to brackets I used)
- Dry wall anchors
- Phillips screwdriver
- Boards for shelves (see below)
- Pre-stain conditioner
- Wood Stain of choice. A great option is Minwax Special Walnut
- Paint brush
- Sock or lint free cloth
- Drop cloth
- Vinyl gloves to protect your hands from wood stain
- Level
Keep in mind I made six shelves, so I’m accounting for all of the supplies I used. You may have different length shelves you are considering and that is perfectly ok!
Just be sure you measure your space well and know what you need prior to getting your supplies!
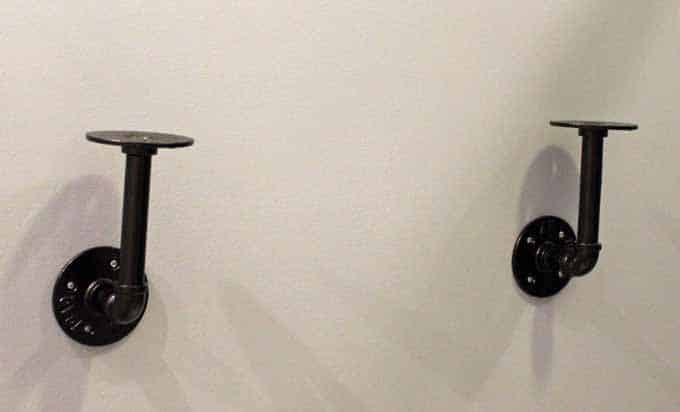
Last time I made shelves similar to these, I got all of my supplies at Lowe’s. But I stumbled upon some black flat iron shelf brackets as well as some 6″ black elbow pipe shelf brackets at Menards for $4.99 each.
That was a pretty great deal in my opinion considering the quality.
Plus, they were already black! When I made shelves a couple years ago, I could only get the industrial pipes in silver which meant I had to spray paint everything black!
Time saver = win!
While I was at Menards, I also got a 1 x 8 x 12′ pine board cut into 24 inch long sections. BUT…when I got it home, I realized I had paid for the 8 inch board, but I got a 6″ 🙁
Not a huge deal, but it did mean I had to make another trip as I had purchased all of my supplies accounting for the 8″ width.
I ended up getting another board at Home Depot as I was there for something else…it all worked out!
Helpful hint:
If you are like many people, you may not have tools at home to complete lumber related DIYs. If you know your dimensions, it is really easy to get someone at most hardware stores (such as Lowe’s, Home Depot, or Menards) to cut the large boards down for you at no additional cost to your boards.
It really makes projects a lot less expensive! The basic quality pine board I got cost right around $8.00 and was used for 6 shelves! Granted, I ended up getting two boards in the end since the worker accidentally got the wrong size for me.
I saved the initial board to make some wood signs. I’m still trying to decide what to make! It will not go to waste, I’m certain!
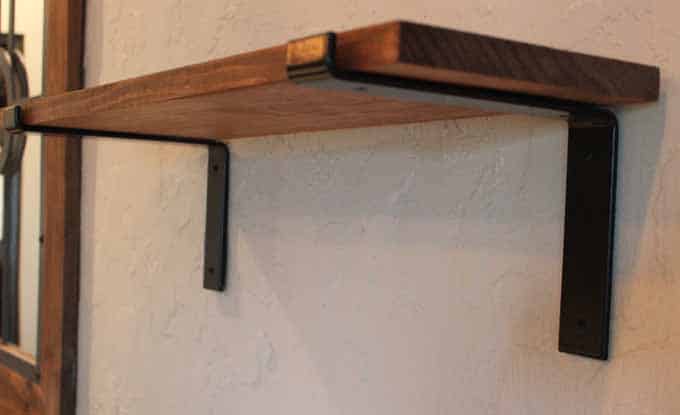
How to Stain the Farmhouse Shelves:

My stain options had been narrowed down to dark walnut or special walnut. Special Walnut by Minwax won out because I felt it tied in better with the majority of my other basement decor.
Plus, since my shelves were going to be in my basement, I wanted to keep it a little bit lighter!
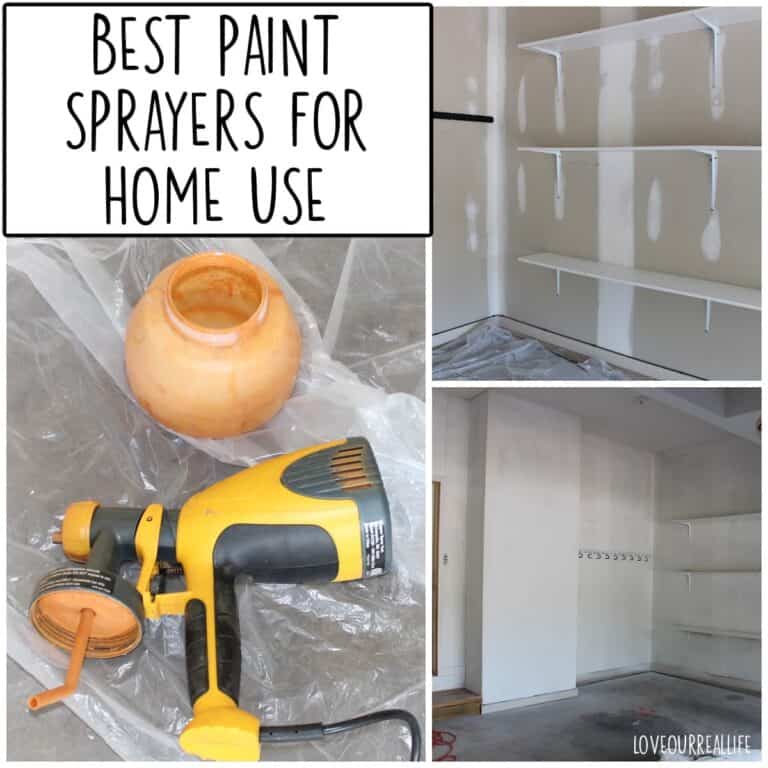
Gather up your supplies.

Protect the floor or surface where you will be staining with drop cloths. I wore gloves as the stain can be messy! These basic disposable gloves are perfect for this job.
No rain was in the forecast the day of my project, so I opted to complete the staining outside. Inside a garage with the door open works well, too! If your staining will be done indoors, be sure to ventilate the area.
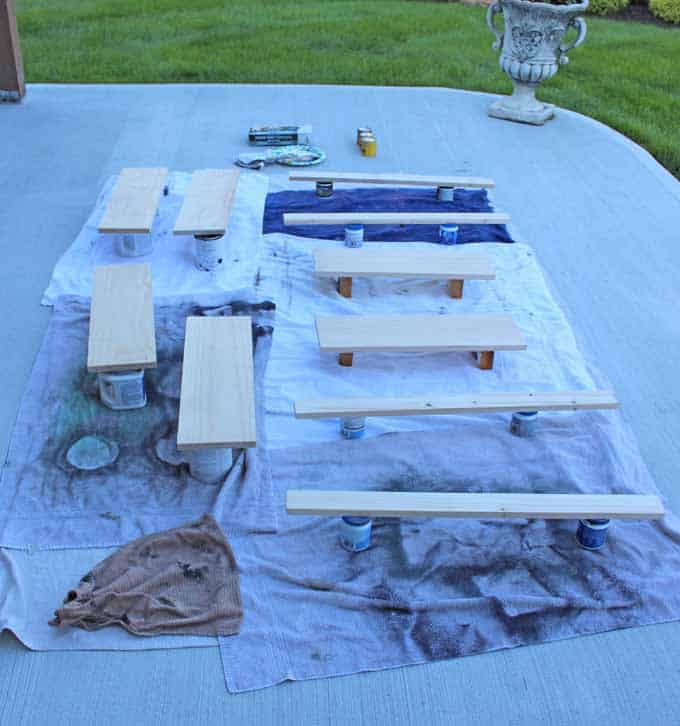
I propped each of the boards on various items I had to make staining easier.
I used the Minwax Pre Stain Conditioner on all of the boards first.
The directions indicate you should stain within two hours of using this, so I stain immediately after applying this.

The Pre-stain Conditioner is used to ensure a more even stain. On cheaper quality boards such as the one I used, it makes a lot of difference! Otherwise the stain looks very blotchy. Don’t skip it!
Stain all of the boards.
Paint the stain onto the boards using a regular paint brush. Wipe away any obvious drips.
All of the boards were stained (top, sides, back of the shelf, and bottom). Then at that point I went back and wiped down all of the boards (lightly) with an old sock to remove any excess stain.
The time it took to apply the stain to all of the boards allowed the stain to stay on several minutes. This gave a richer color. Perfect!
If you want a light stain, wipe them sooner. Or, if you want darker, leave the stain on longer.
The boards were positioned in such a way to allow them to dry well on both sides. They were outside drying about 2 hours before I brought them in to finish the shelves.

No top coat was used for my project as they will not receive much wear and tear. But, if you want a layer of protection, you could use polycrylic in your finish of choice (I like matte!).
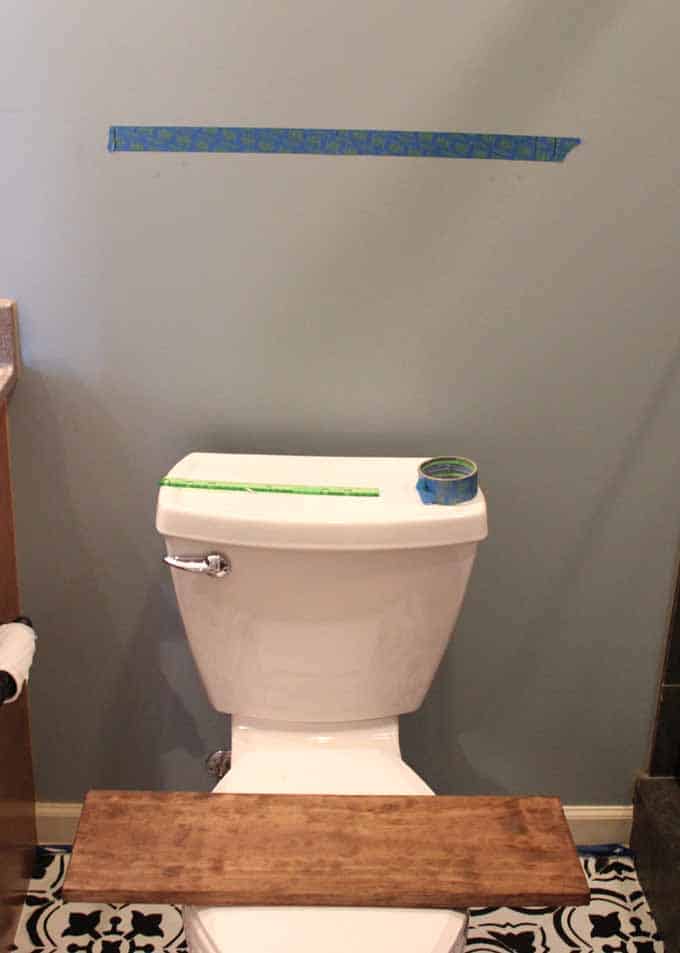
Measure your space well!
This is the least fun (and the hardest!) part of this project in my opinion. But, it is one of the most important steps in making sure your shelves look great.
I have found that “eyeballing” where I want the lowest shelf is where I start. At that point I put up a piece of blue painter’s tape, measured to the length of my boards.
A level was used at the top of the blue painter’s tape to make sure it was level. Then I used a pencil to mark where my brackets would go.
It’s important the shelves are level so you have an even, flat surface when it’s complete.
You might need to be creative in determining where your screws should go, depending on the types of brackets you use.
The L-shaped brackets were a bit easier as there were fewer screws to align.
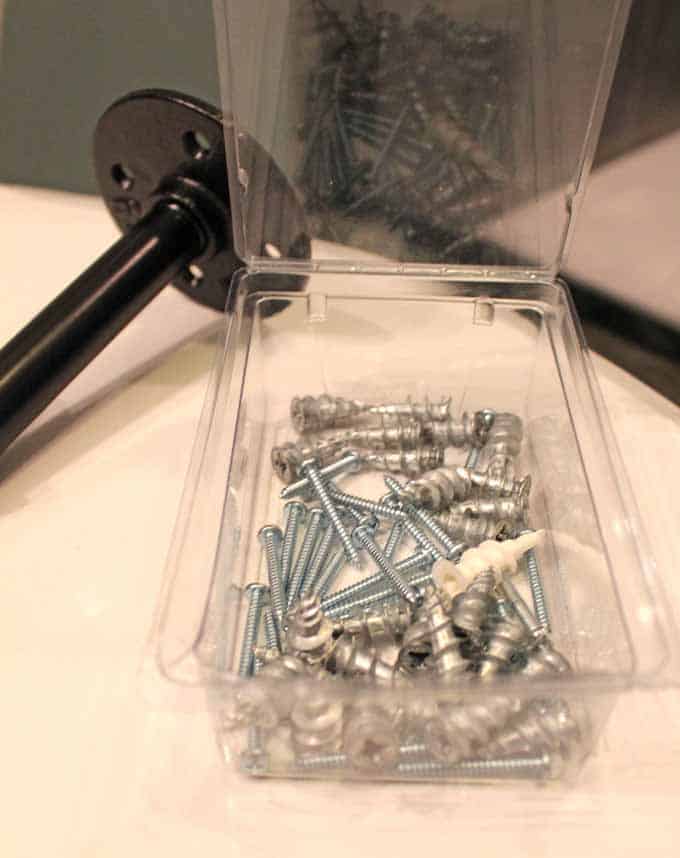
Once all of the measurements were determined, then the drywall anchors could be used. Finally!
It’s not always possible to hang shelves onto wood studs, so drywall anchors can be so helpful.
There are several different options available, but the most important thing is to ensure the type you select can withstand heavy weights or at the very least, the amount of weight you are intending to hang or put on it.
Installing Heavy Duty Shelves using Drywall Anchors:
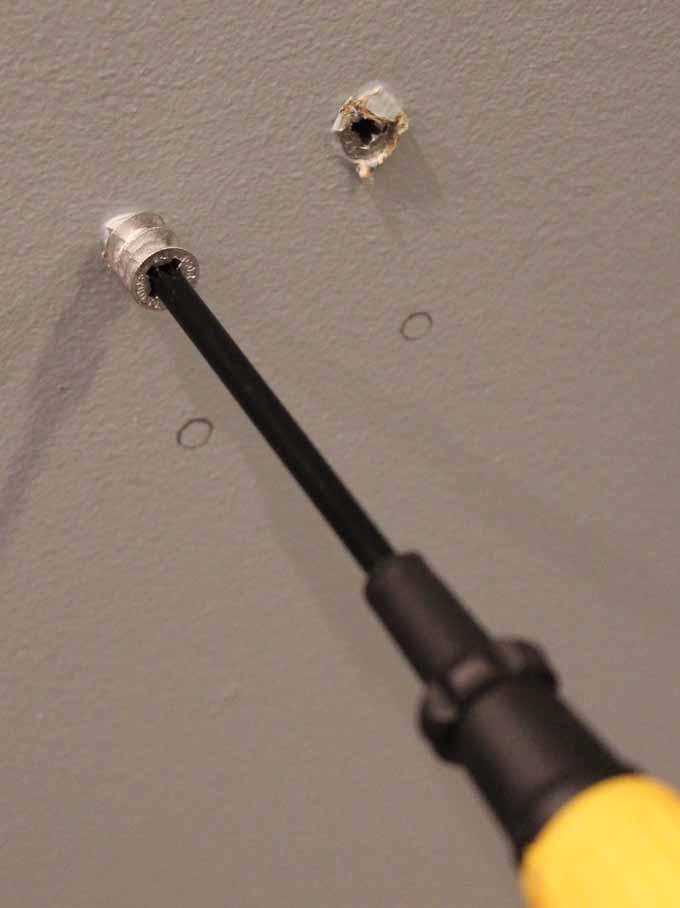
As I mentioned, I marked each of the intended screw holes with a pencil.
What works best for me is to push the end of the screw into the wall slightly, making the drywall anchor easier to screw into place.
Drilling pilot holes is another alternative to make this process easier.
Then begin drilling the anchor into the wall with a screwdriver.
For whatever reason, I always just use a regular phillips screwdriver versus an electric screwdriver. Use what you feel most comfortable using!
After each of the drywall anchors were in, I held the bracket in place then screwed the screws into the drywall anchors.
I used silver screws as that is what I had. SO, I did end up going back over each of the screws with a tiny paint brush and some black chalk paint.
It only took me about 5 minutes and it would have driven me crazy to look at the silver screws in the black shelves every day.
That is it!
Honestly the hardest part is measuring for the length of the shelf! Using the drywall anchors is fairly easy, but they make your shelves much more stable.
Keep in mind, installing shelves works best if your shelf placement is on a stud. That would be even more sturdy. BUT, the studs never seem to be where I need to hang something, so drywall anchors are a great alternative!
Be warned – The drywall anchors do leave a bit of a mess when screwing into the wall AND a fairly decent hole should you decide to take down your shelves.
I have found they are pretty easy to patch and paint over though. That has been done way too many times to count in my house!
What do you think?
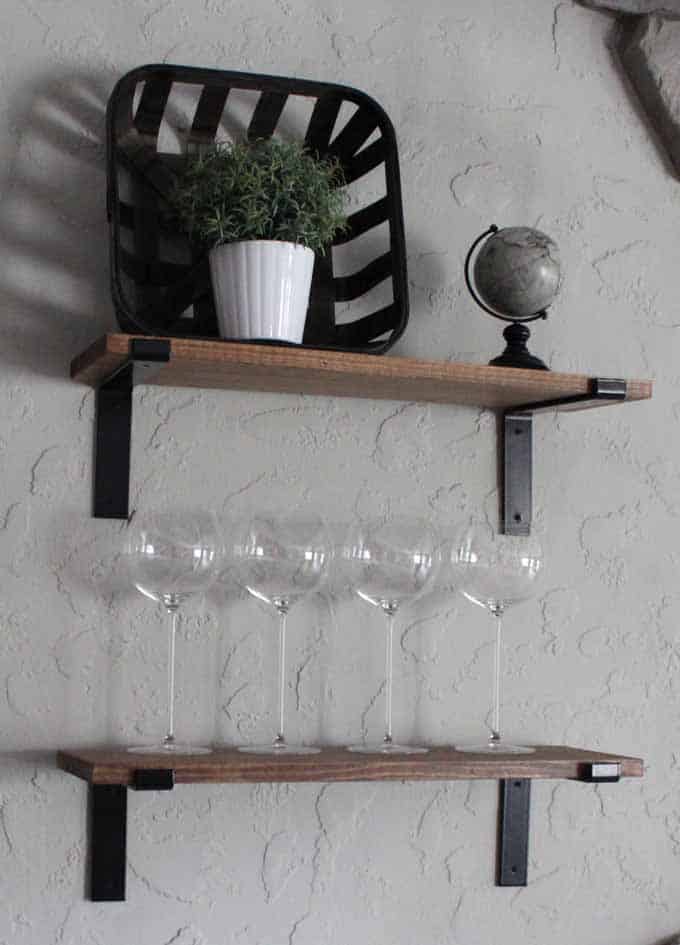
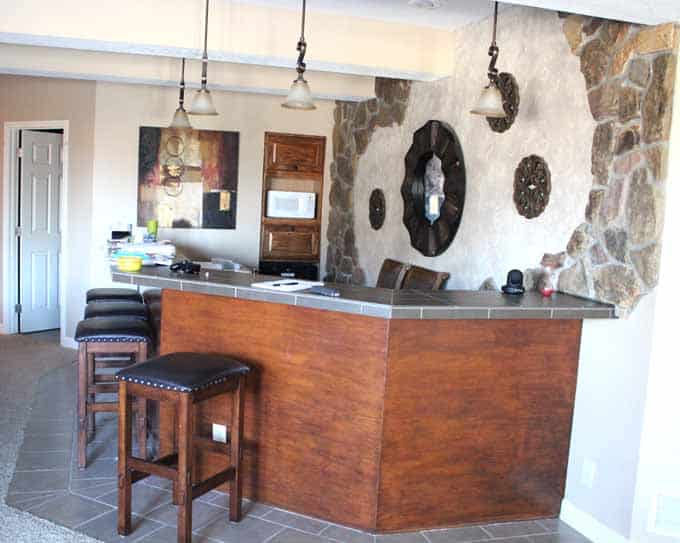
Farmhouse shelves behind my basement bar:


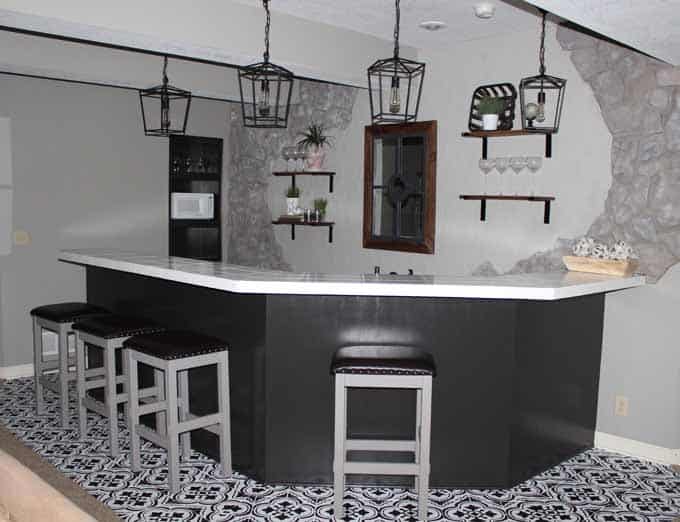
I can’t help myself but to show you a “before” picture of my basement:
The difference seems even more dramatic in person! To see some of our other basement makeovers, click on any of the posts below:
- How to Paint Tile Countertops
- Stone Fireplace Update // It’s Not So Complicated After All! (How to paint a stone fireplace)
- Painting Cabinets without Priming // The Ultimate Amateur’s Guide
Let’s not forget the shelves in my basement bathroom. I don’t want to give too much away about that space because lots of changes are taking place there that I’ll be sharing in an upcoming post.
I was a tiny bit sad because I dropped something heavy on one of the shelves after installation that left a small dent in the wood.
BUT, the good news is the shelves were stable enough to deal with it!
Here is a peek at the shelves in the bathroom:

I think you are officially ready to make your own rustic wood shelves AND install them using drywall anchors, don’t you?
FAQS
A toggle bolt, or butterfly bolt is a screw with a spring loaded wing nut. When used as intended, it should stay secure to the back of the wall.
A molly bolt is a type of screw that connects items to plaster or gypsum board. The anchor is lodged in the hole and expands when it is in position to give it security for hanging items.
Expansion anchors or plastic anchors are the basic anchors you will get when you purchase a wall picture, frame, etc. Note, they typically do not hold much weight and are often not the best option for hanging items heavier than a few pounds.
Leave a comment below! Tell me what projects you are completing. OR, tell what projects you’d love to start, but aren’t sure where to begin!
DON’T FORGET TO PIN HOW TO HANG HEAVY SHELVES FOR LATER REFERENCE!
Connect with me: Pinterest / Instagram / Facebook


Absolutely love the shelves! Better than you could buy premade!!
Thanks so much for the sweet comment, Jenifer!