Buffalo Plaid Embroidery Hoop Ornaments // Learn How to Make Your Own!
I’m in love with the buffalo plaid embroidery hoop ornaments I’ve seen floating around lately! So of course I decided it was time to make my own! Last Christmas I was obsessed with buffalo plaid and used it to make envelope pillow covers and my DIY table runner.
Apparently this winter is no different. The buffalo plaid obsession continues!
If you want to personalize your Christmas decor this season, you need to try this DIY embroidery hoop ornament.

See more Christmas DIYs and crafts here!
My Silhouette Cameo skills are still lacking, but I was able to make this work without too much difficulty.
This post contains affiliate links. Should you click on one of my links and make a purchase, I might make a small commission at no extra cost to you. See my disclosure policy for details.
How to make buffalo plaid embroidery hoop ornaments:
As per usual, this took a bit longer than I had anticipated. This was mostly due to my inexperience with my Silhouette Cameo. Mastering that machine is something I plan on doing VERY soon.
If you follow Love Our Real Life, be prepared for many more Silhouette Cameo posts in the upcoming months.
See what I did there?
If I put it in writing for others to see, I feel like I’ll have more accountability! Does anyone else try to trick themselves like this?!
Supplies for embroidery hoop ornaments:
- Embroidery hoops. Mine were 4 inch, but you could select a larger size if you’d like. This tutorial is for “ornaments” but this could easily be a wall hanging, too!
- Fabric. My focus is on buffalo plaid, but feel free to grab any fabric you’d like. The flannel worked great!
- Silhouette Cameo 3
- Heat transfer vinyl
- Ribbon of choice to decorate top
- Wood stain in your stain color of choice should you decide to stain the outer hoop. You could also paint the hoop!
- Chip brush for wood stain
- Towels to protect floor
- Rag to wipe off excess wood stain.
Steps 1: Stain the embroidery hoops
This step is optional, but I think the stained hoops gives it more of a rustic look. I’m planning on giving these ornaments as Christmas gifts, so I stained A LOT at one time.
If you are one of my speech pathology work friends, I’m sorry you are seeing your gift in advance. I have a blog to run, ladies;-)
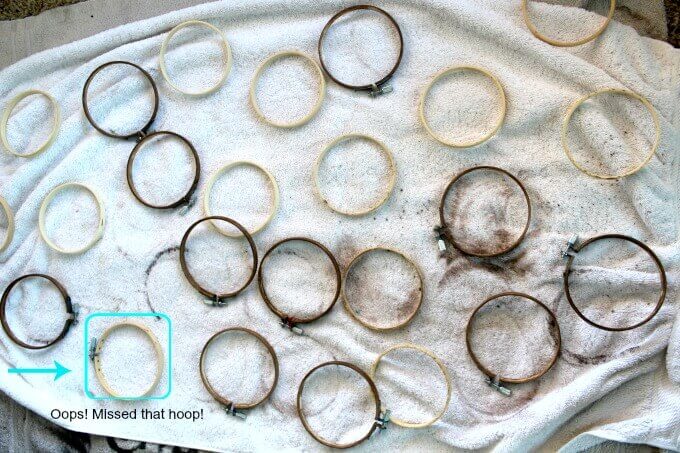
You will only need to stain the outer hoop as this is all that will be seen!
The stain was applied with an old chip brush. Once all of the stain was on the hoops, I went back and wiped off any drips.
Allow a few hours for the stain to dry prior to assembling your hoops with the fabric!
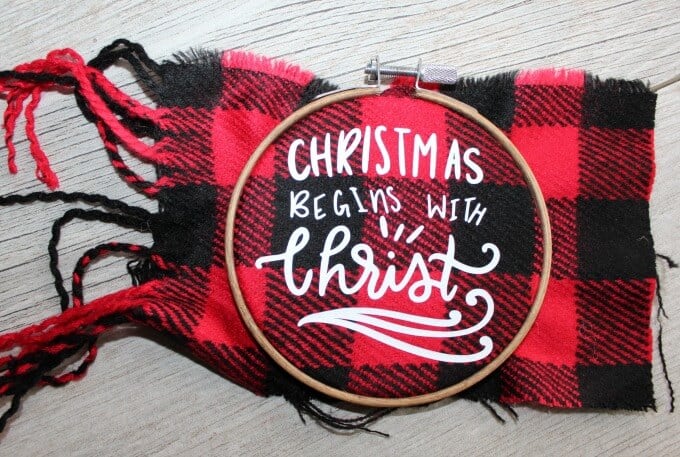
Step 2: Determine Design for vinyl and create!
As I mentioned above, I am certainly not an expert with my Silhouette Cameo yet. I muddled my way pretty well. I followed a beginner’s guide for heat transfer vinyl from The Pinning Mama.
Even though I’ve made a few t-shirts, I’m still not 100% confident in my skills. If you are new to using a Silhouette Cameo, please check out the tutorial for using it above.
I tried to keep my designs around 3 inches to ensure they would fit within the 4 inch hoop.

Step 3: Use an iron or heat press to iron the vinyl onto your fabric
If you do not own a heat press (I don’t), an iron will do the trick! I use parchment paper over the vinyl and hold the iron in place for 15 seconds. Hold it with a lot of pressure and do not move the iron around.
This method has worked well with t-shirts as well.
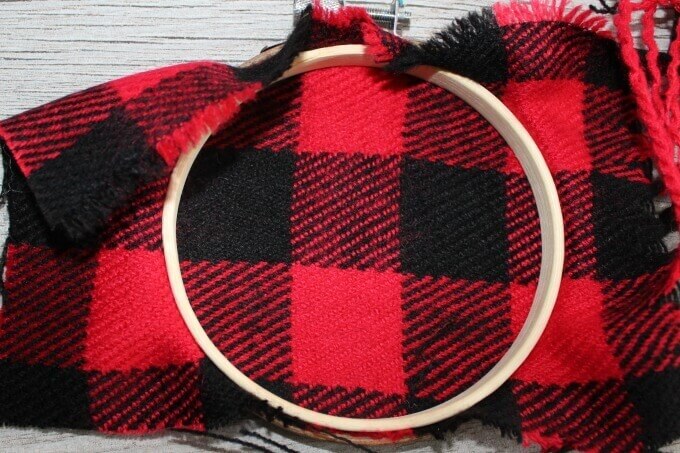
Step 4: Place the fabric in the hoop
Put the inside hoop on a hard surface. Center the design over the top of the inner hoop. Place the outer hoop on top of the fabric. You might need to loosen the outer hoop slightly.
Gently slide the outer hoop over the inner hoop.
Tighten the hoop and pull the fabric as needed to ensure it is taut and centered.
Side note: I used old scraps left over from when I made my envelope pillows covers last year.
This is the perfect project to use up your scraps! As you can see in the above image, the fabric came from a flannel buffalo plaid throw. I got it as a doorbuster deal at Michael’s last season for a few bucks!
It was too thin to really use as a throw blanket, but I got a TON of use out of it with a variety of projects.
If you come across table cloths, unlined curtains, sheets, etc that are on clearance AND you love the fabric grab them. Even if you can’t use them as they are intended, you might just find a way to repurpose them.
Fabric is kind of pricey, so I’m always on the look out!
Step 5: Cut the excess fabric from the back
Definitely do not overthink this part! Once the outer hoop is sufficiently tightened, simply cut away the excess material.
Nothing fancy is needed!
In the below image, you can see the unstained inside hoop. The excess fabric is hanging around the edges.
Just cut around the edges, trimming away any loose pieces. You will likely not be able to get super close, but certainly good enough!

Step 6: Make a pretty bow for the top of the ornament
Get as creative as you’d like with this part!
I had some natural raffia in one of my craft boxes. Absolutely no idea why I’d purchased it, but it worked out great for these embroidery ornaments!
Some faux holly berries were added with hot glue and it was done!
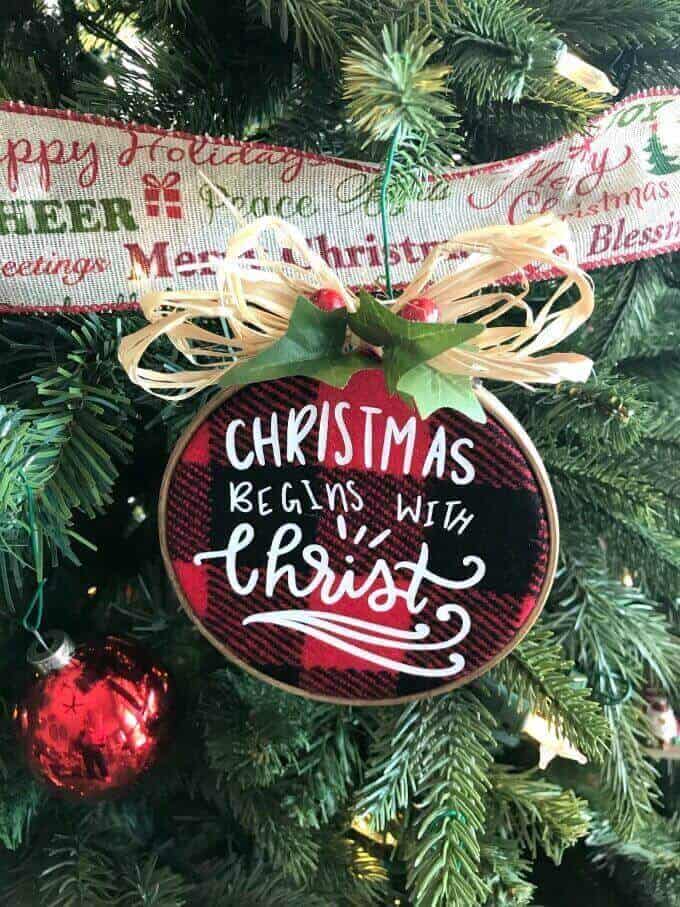

See the fun, buffalo plaid tree skirt? It’s yet another inexpensive throw blanket used as a tree skirt.
The lighting is not great in my photo above, but you get the idea of how our Christmas tree looks! Our new ornament is front and center.
Here’s another buffalo check ornament:

RELATED READING…
• How to Make a Personalized Scrabble Tile Ornament
• Make a Wood Slice Ornament (Wood Burning option and DIY Gnome
• Buffalo Plaid Table Runner DIY
• Envelope Pillow Tutorial (In Buffalo Plaid)
Don’t forget to pin this to your favorite Christmas Pinterest board for later!
Have a great week!

This is absolutely adorable! I am obsessed with buffalo plaid. It’s so cute and festive! This would be such a fun DIY!
I love buffalo plaid, too! It was a super fun DIY that I roped my daughter into helping me with. Love that time together! Have a great week, Madison!
Love it! That’s adorable and the messsage is so great!
These are so cute — I love them! I’m going to use them as dual-purpose gift tags!
What a great idea, Amy! I’m sure your gift recipients will love them!
These are so cuuute! Adding to my Christmas DIY board.
Awwww, thanks Mary!
April my daughter just got a silhouette machine. I live this ornament. Going show her so we can try and make some
That’s so exciting, Candy! I have so much to learn! Please share any fun projects you try! Your daughter should join some Silhouette Cameo 3 FaceBook groups. I’ve gotten so much valuable information from those!
I really LOVE the buffalo plaid pattern. I’ve been wanting to incorporate it into my Christmas decorations. This seems like a pretty simple way to add a splash of buffalo plaid.
I love buffalo plaid possibly too much! It is just so cozy. These ornaments are a great way to add subtle splashes into your decor;-) Thanks, Andrea!
This is such a great idea! I love this – I have always wanted to try making my ornaments, and this is so unique!
Glad you like them, Alexandra! I’d love to see a picture if you give it a try!
These are adorable! I’ve used embroidery hoops before but this is a great use of an old scarf or scrap and I love adding the words! I’m hoping to try this with my kids help too! Thanks!
My pleasure, Jennifer! I love getting my kids involved in my DIYs. This is a great way to personalize an ornament!